The Android app, screen by screen
Running your whole shop from the phone in your pocket — including when there's no network.
The Android app is not a smaller copy of the website. It is a complete till built to keep working when the internet does not: everything you enter is saved on the phone first and sent up to the server when a connection returns. That one design decision explains most of what's different about it, and it runs through this whole manual.
Worked examples use the customers Dozie, Adaora and Kenneth — the same names as the web manuals, so the two read together.
- Set the phone up while it's online, in the shop, before it goes out to a stall or a delivery round.
- Watch the sync badge. Green ✓ Synced means the server has everything this phone has. Amber ↻ Sync now means it doesn't yet.
- Attach a customer to every credit sale. A balance left on "Cash — walk-in" belongs to nobody and can never be chased.
1. Getting the app
- Install MAT Smart Shop from the Google Play Store.
- It runs on ordinary Android phones and tablets. A tablet on a stand makes a comfortable counter till; a phone is ideal for the floor, a market or deliveries.
- Allow the permissions it asks for when you use a feature: the camera (scanning documents), Bluetooth (receipt printers), and notifications.
- From the menu, Watch: Your First Week plays a short video walking through your first customer, item and sale.
2. Creating a store on the phone
If you don't have a MAT Smart Shop store yet, tap Create a New Account on the sign-in screen. It's the same two-step registration as the website:
- Step 1 of 2 — company / store name (at least 2 characters, unique across MAT Smart Shop), business address (at least 6 characters) and business email.
- Step 2 of 2 — your name, country and state (the currency fills in from the country), and a password of at least 6 characters, typed twice.
- Create My Store.
If the email already has a store, the app offers Add New Store — Confirm Your Identity: enter that account's password to create another store under it. Confirm your email from the message you're sent — see the Store Setup, Users & Security guide for why that matters.
3. Setting up this phone
The first time you sign in on a phone, the app has to fetch your store onto it. This needs an internet connection; afterwards the phone works offline.
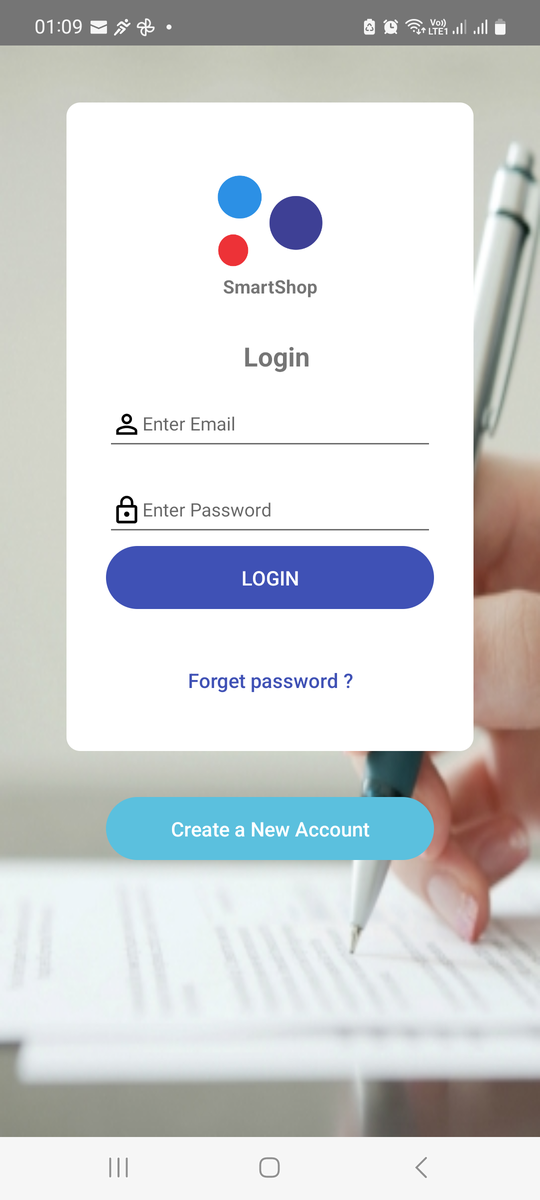
- Connect to Store — "Recover a store into this phone and use offline". Enter your email and password and tap Login.
- If your account has more than one store: Choose a store for this device. A phone belongs to one store at a time.
- Select a sales point: Download Record From Date — first choose how far back to bring your history onto the phone (e.g. the start of this year). Further back means more history offline, but a longer first download. Pick a sales point (till) from the list, or type a name under Add a sales point to continue and Save. Confirm "Do you want to continue as Front Counter sales point?"
- The app downloads your items, customers, payment types and records, then opens Sale Center.
4. Signing in and out
| Situation | What happens |
|---|---|
| Everyday sign-in | Email (or username) and password. Works offline once the phone is set up. |
| Forget password? | Enter your email; a new password is emailed to you. The first sign-in with it must be online, because the phone doesn't know the new password yet. After that, offline sign-in works again. |
| "That account belongs to a different store" | This phone is set up for another store. Use the right account, or reset the phone's store with the owner's help. |
| "Invalid Login" / "Invalid Credentials" | Wrong email or password — or, offline, a password changed elsewhere that the phone hasn't learned yet. Get online and try again. |
| Sign Out (Settings) | Ends the session and clears that user's access from the phone, so the next person to sign in doesn't inherit it. |
5. Getting around: Sale Center and the menu
5.1 Sale Center — the home screen
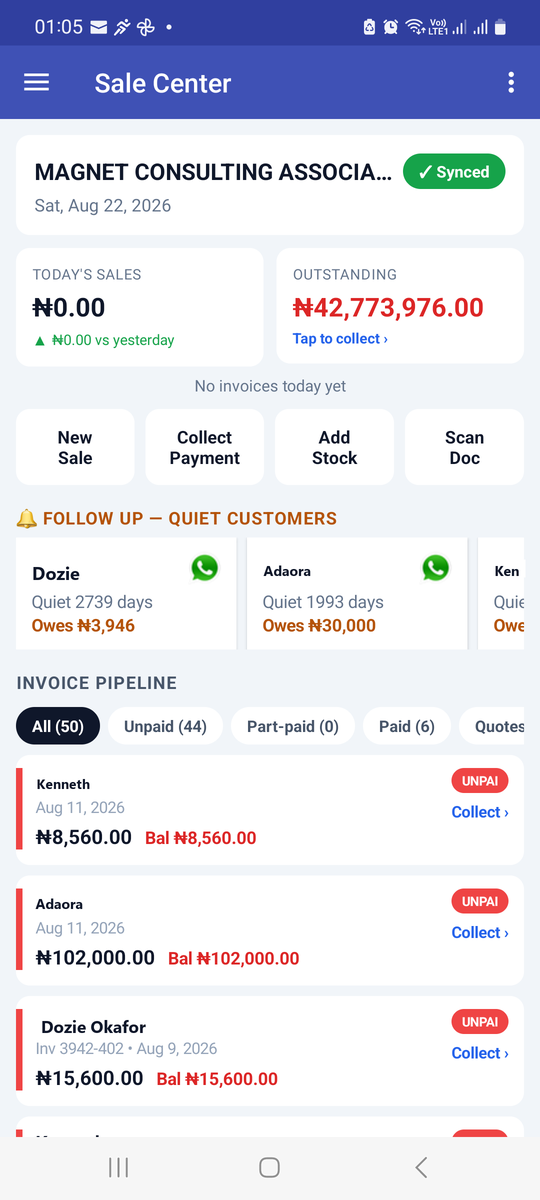
| Element | What it gives you |
|---|---|
| Sync badge | ✓ Synced (green), ↻ Syncing…, or ↻ Sync now (amber — tap it to sync). Section 22. |
| Today's Sales | Today's takings, compared with yesterday. |
| Outstanding | Everything owed to you, with Tap to collect ›. |
| New Sale · Collect Payment · Add Stock · Scan Doc | The four things a counter does most, one tap away. |
| Follow up — quiet customers | Swipe through customers who've stopped buying: "Quiet 23 days", what they owe, and a WhatsApp button. |
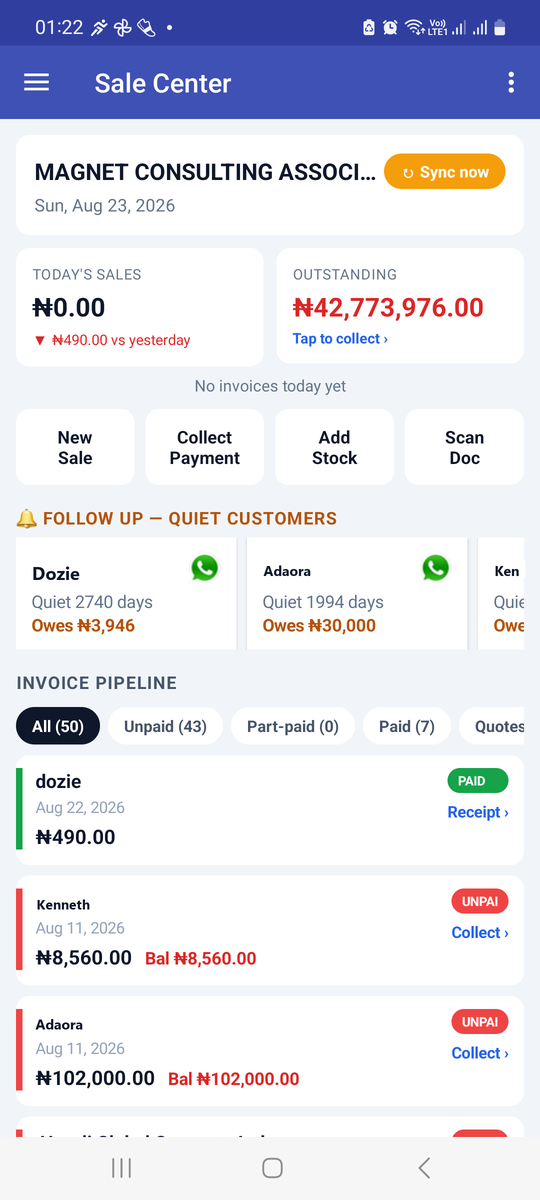
| Invoice pipeline | Filter chips — All, Unpaid, Part-paid, Paid, Quotes — over recent invoices. Collect › goes straight to taking payment; Receipt › to sharing the receipt. |
A just-made sale or quote opened from here before the phone has synced may say "This sale hasn't synced yet — open it after the next sync." Tap the badge to sync, then open it.
5.2 The menu
Tap ☰ at the top left. The drawer header shows the store and the user — check them before entering anything. The drawer is long; swipe up inside it for the lower groups.
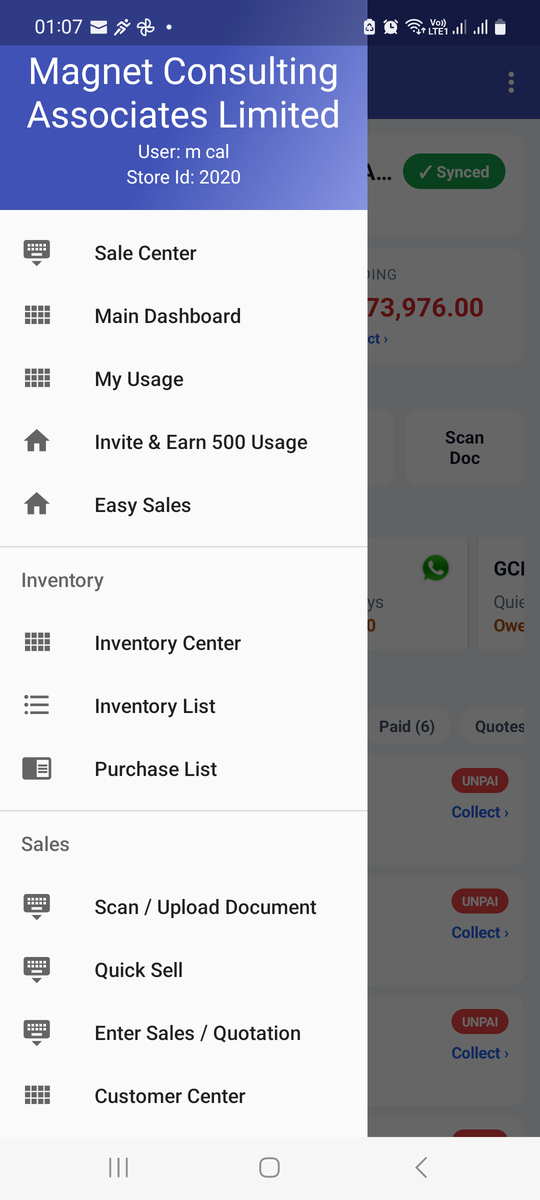
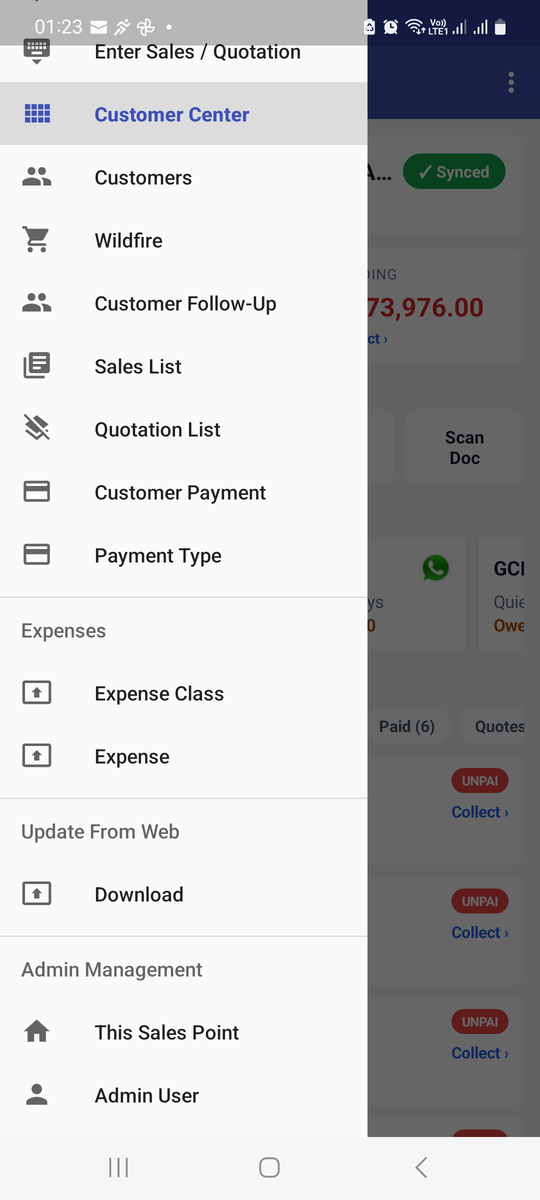
| Group | Items (section) |
|---|---|
| (top) | Sale Center (5) · Main Dashboard (7) · Watch: Your First Week · My Usage (25) · Invite & Earn 500 Usage Units (25) · Easy Sales (6) |
| Inventory | Inventory Center · Inventory List · Purchase List (15, 16) |
| Sales | Scan / Upload Document (18) · Quick Sell (8) · Enter Sales / Quotation (9) · Customer Center · Customers (12) · Wildfire (20) · Customer Follow-Up (19) · Automatic Messages (19.1) · Sales List (10) · Quotation List (11) · Customer Payment (13) · Payment Type (14) |
| Expenses | Expense Class · Expense (17) |
| Update From Web | Download (22) |
| Admin Management | This Sales Point (23) · Admin User · Other Users · User Permissions (24) · Subscription (25) |
| Report | Sales · Daily Sales · Inventory Value · Profit And Loss · Expense · Tax · Customer Follow Up (21) |
| Settings | Edit Shop · Auto-Sync Interval · Version · Validate Data · Sign Out (22, 26) |
Staff see only the items their permissions allow; opening one they lack shows "You don't have permission to open that screen". Permissions are set by the owner on the website (section 24).
6. Easy Sales
Easy Sales (top of the drawer) is a simple launch pad for newer users, built around three cards:
| Card | Takes you to |
|---|---|
| Sell Online Today — "Upload your products to start selling online today and share your store link to your contacts." | Sell Online: publish items to your Wildfire storefront, or share ones already published. |
| Record Your Sales — "Record sales, apply discounts, see your profit and loss as you sell…" | Record Sales: the sale screen. |
| Scan a Document — "Scan or upload a receipt, invoice or expense and let AI extract the details for you." | Scan / Upload Document (section 18). |
Below them, shortcuts: Do more with Main Dashboard, Complete online store setup and Setup Delivery Locations.
7. Main Dashboard
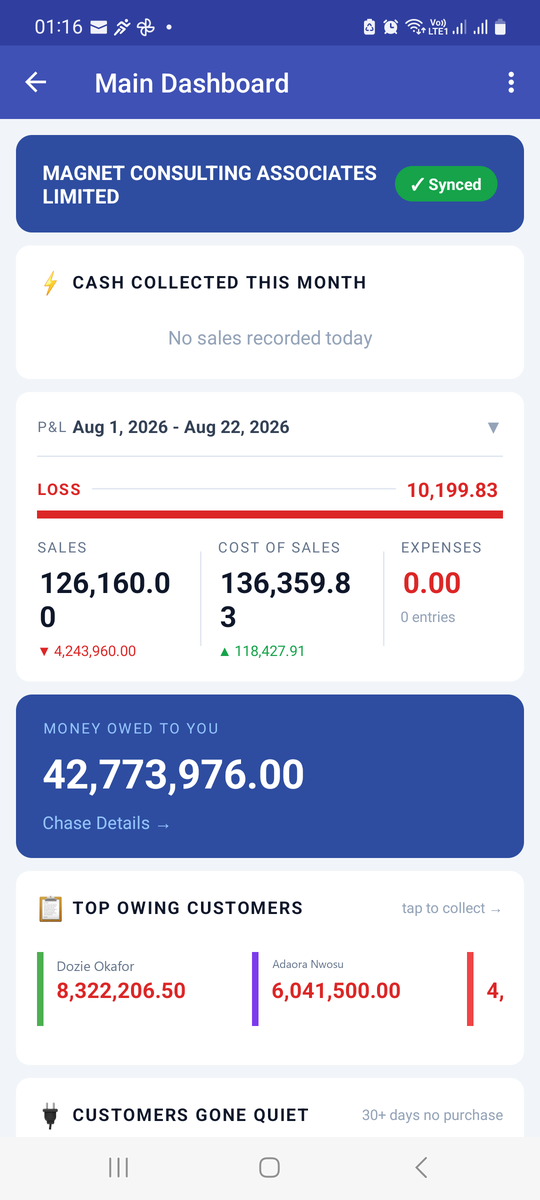
- Cash Collected This Month — money actually received, not invoiced.
- Profit & Loss for a date range you can change, with a PROFIT or LOSS bar and Sales, Cost of Sales and Expenses beneath, each with an arrow against the previous period.
- Money Owed To You, with Chase Details →.
- Top Owing Customers (ranked #1, #2…) — tap to collect → records their payment.
- Customers Gone Quiet — "23 days silent", last sale date and what they owe.
The figures come from the phone's own records, so they are only as current as the last sync. For how to read sales, cost and profit, see the Dashboards & Reports guide.
8. Quick Sell — the fastest way to ring up a sale
Android-only, and the reason many shops keep a phone on the counter even when a PC is available.
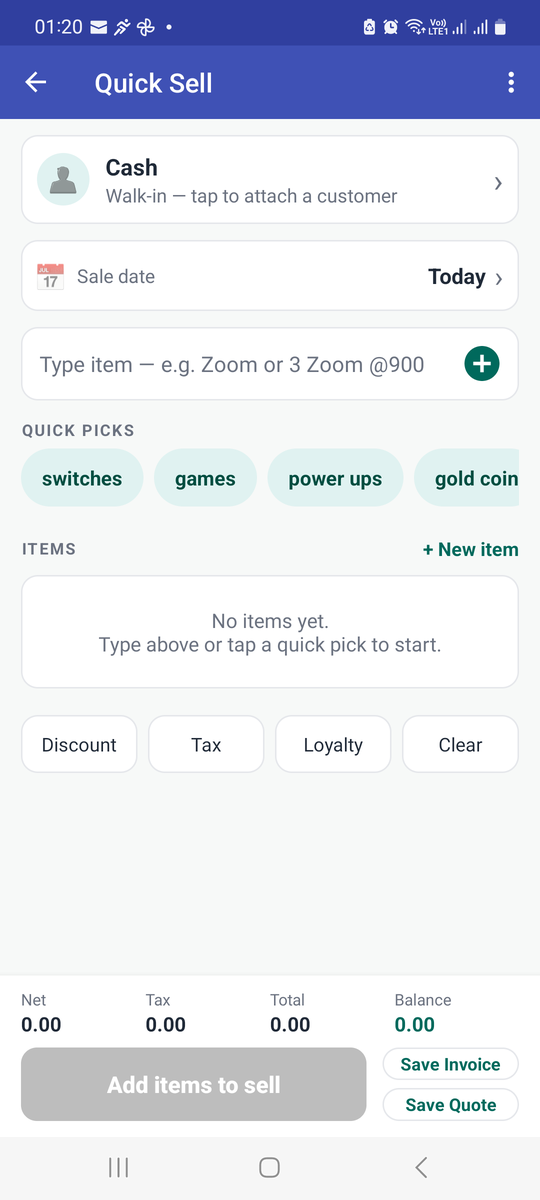
8.1 The screen
| Part | Use |
|---|---|
| Customer | Starts as Cash — walk-in. Tap to search and attach a real customer, or create one on the spot (name, optional phone and email). |
| Sale date | Today unless you change it. |
| Type item | The clever part — see 8.2. |
| QUICK PICKS | Chips for your fastest movers; one tap adds a line. |
| + New item | Create a product (Item (stock) or Service, sales price, cost price, optional opening stock) without leaving the sale. |
| ITEMS | The lines so far. Tap a line to change its Quantity, Unit price or Apply tax to this line. |
| Discount · Tax · Loyalty · Clear | Apply to the whole sale. Discount offers preset percentages or a custom one. Loyalty needs an attached customer with a loyalty balance. |
| Footer | Net, Total, Balance, and the main button — then Save Invoice or Save Quote. |
8.2 Typing items
| You type | The app understands |
|---|---|
| Zoom | Search for Zoom; pick from the suggestions (each shows stock and price). |
| 3 Zoom | 3 × Zoom at its normal price. |
| 3 Zoom @900 or 3 x Zoom @ 900 | 3 × Zoom at ₦900 each. |
| Zoom @1,500 | 1 × Zoom at ₦1,500. |
| sell 3 Zoom @900 | "sell" at the start is ignored. |
A name that matches nothing offers to create it as a new item. Typing a price with @ overrides the price for this sale only — the item's own price is unchanged.
8.3 Taking the money
With items in the cart, the grey Add items to sell button becomes a green Collect amount. Tap it for the payment sheet:
- Amount due; choose a PAYMENT METHOD (or + New payment type).
- AMOUNT RECEIVED — tap Exact for the exact amount, or type what was handed over. Over-payment shows the Change to give; under-payment shows the Outstanding that stays on the customer's account.
- Collect saves the sale.
If you save something that looks like one you've just saved (same customer, same total), you'll see Possible duplicate — "Save anyway?" Check before you tap yes.
8.4 A full walkthrough: sale → invoice → payment → the customer's account
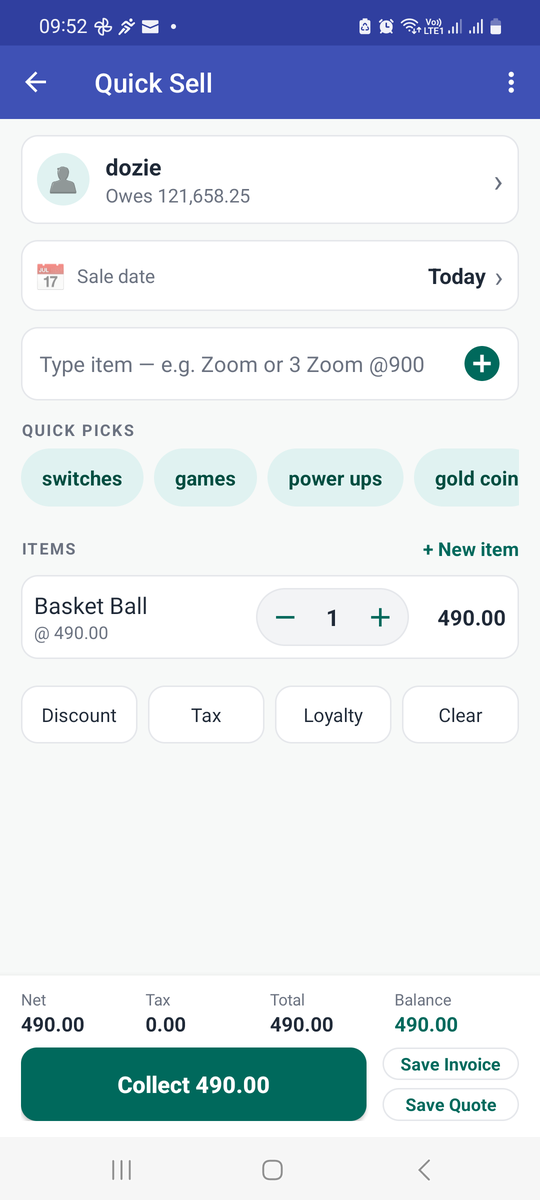
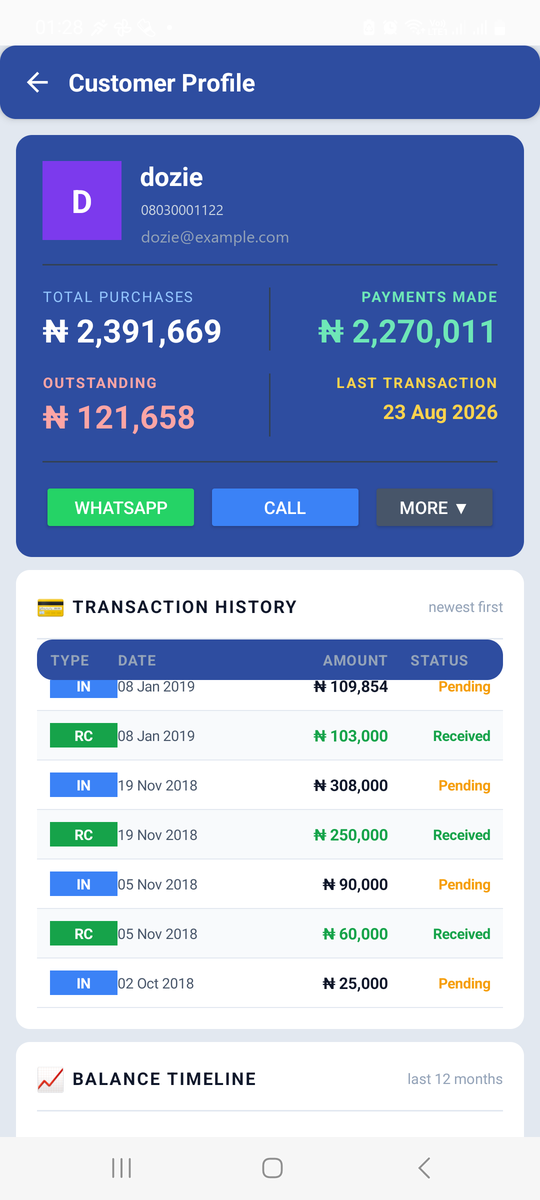
One Basket Ball to Dozie, followed all the way to his updated balance.
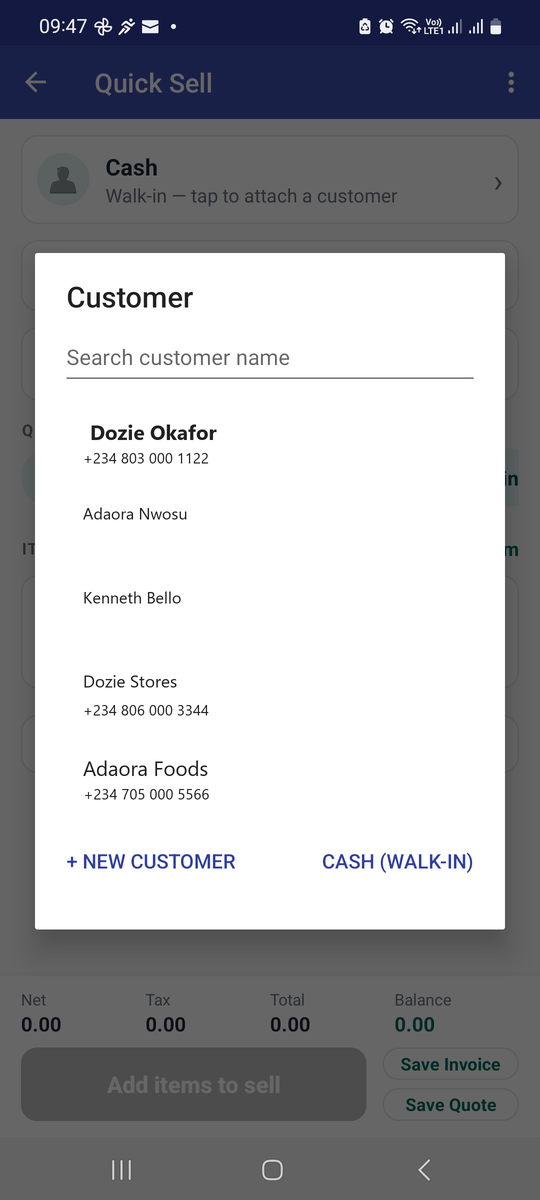
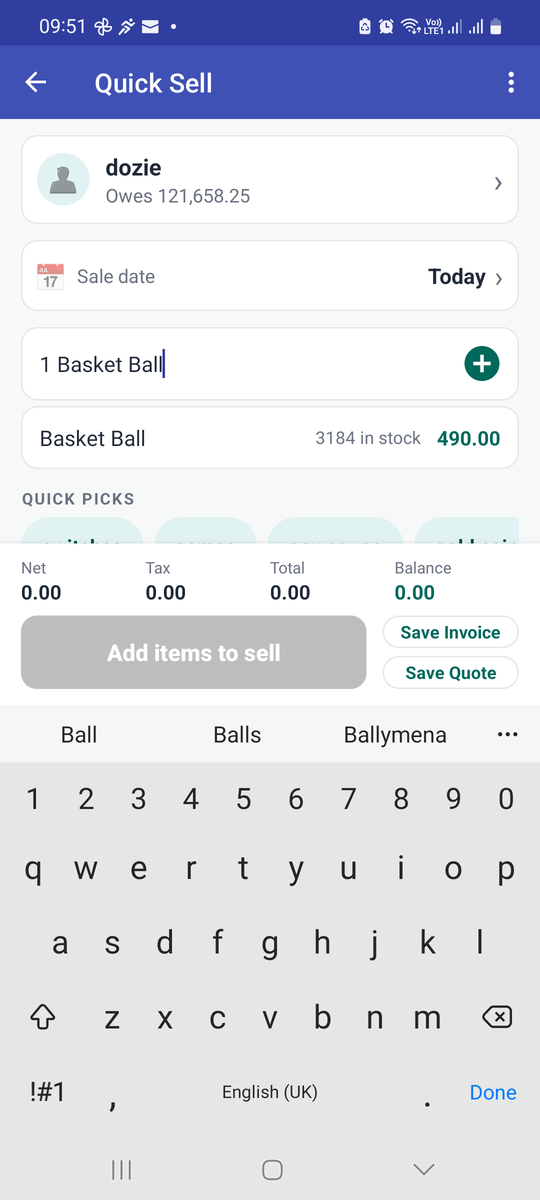
With Dozie attached, the customer row shows his existing balance ("Owes 121,658.25") before you add to it. Tapping the suggestion adds the line and the footer turns into Collect 490.00:
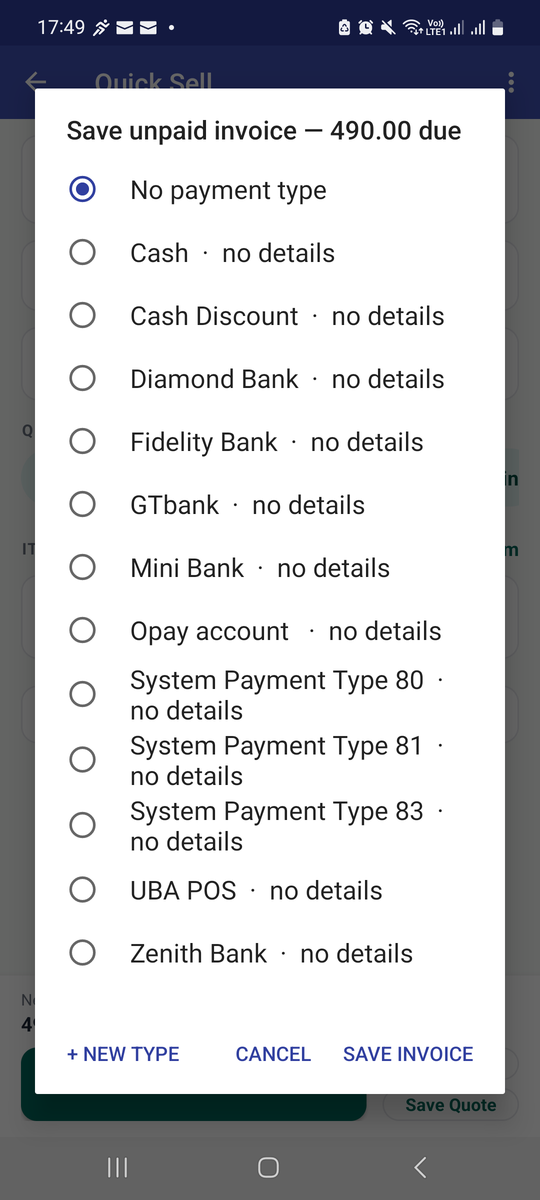
For a credit sale, Save Invoice asks for the payment type the customer will use to settle:
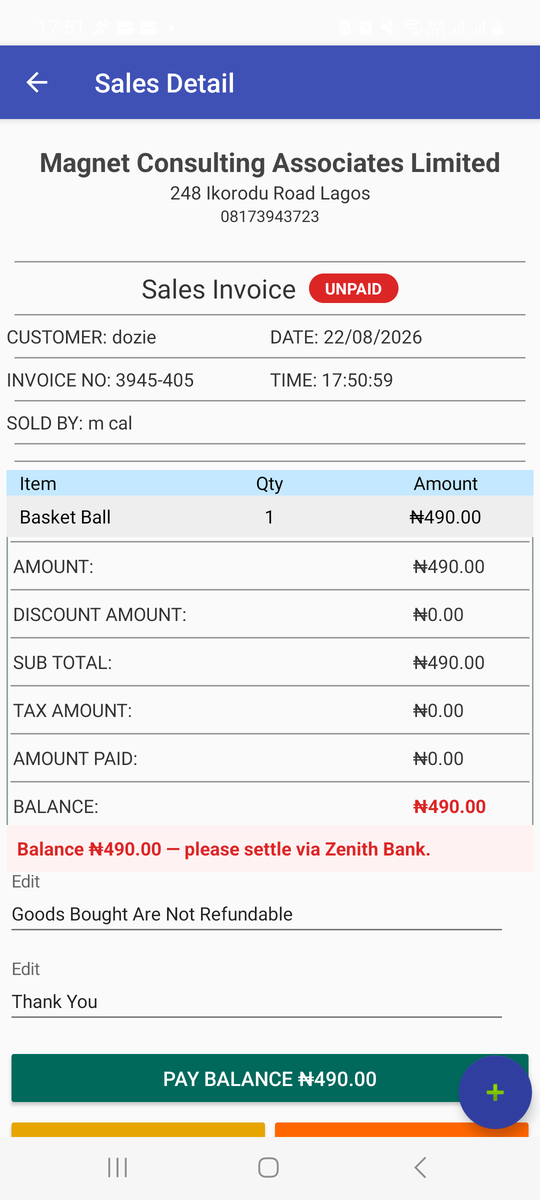
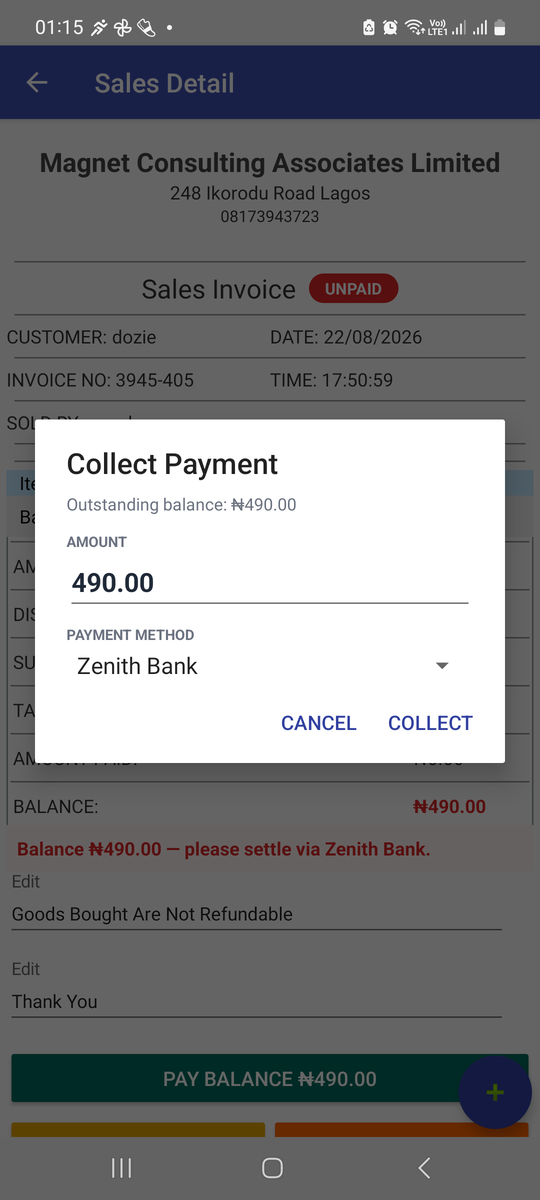
Pay Balance opens Collect Payment, pre-filled with the outstanding amount and the invoice's payment method. COLLECT posts it and offers a receipt:
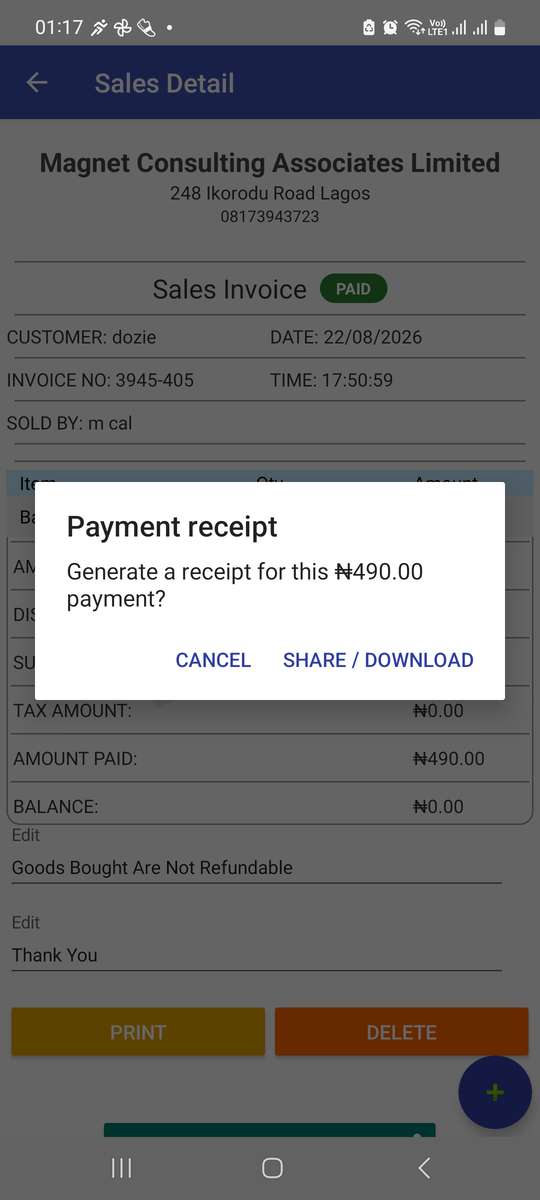
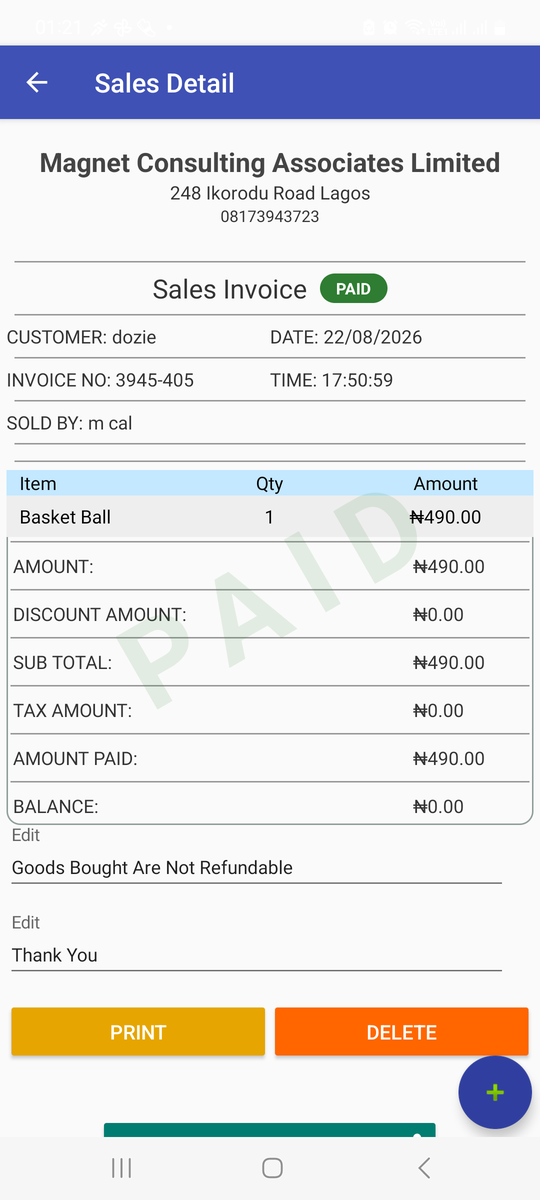
Back on Sale Center, the Paid count has gone up by one, Dozie's card shows Receipt ›, and the badge reads ↻ Sync now — the sale exists on the phone, and the next sync sends it up.
9. Enter Sales / Quotation
The full sale screen, for when a sale needs more than Quick Sell's speed: several lines with their own tax, a specific payment type, a discount, a paid amount, or a quotation.
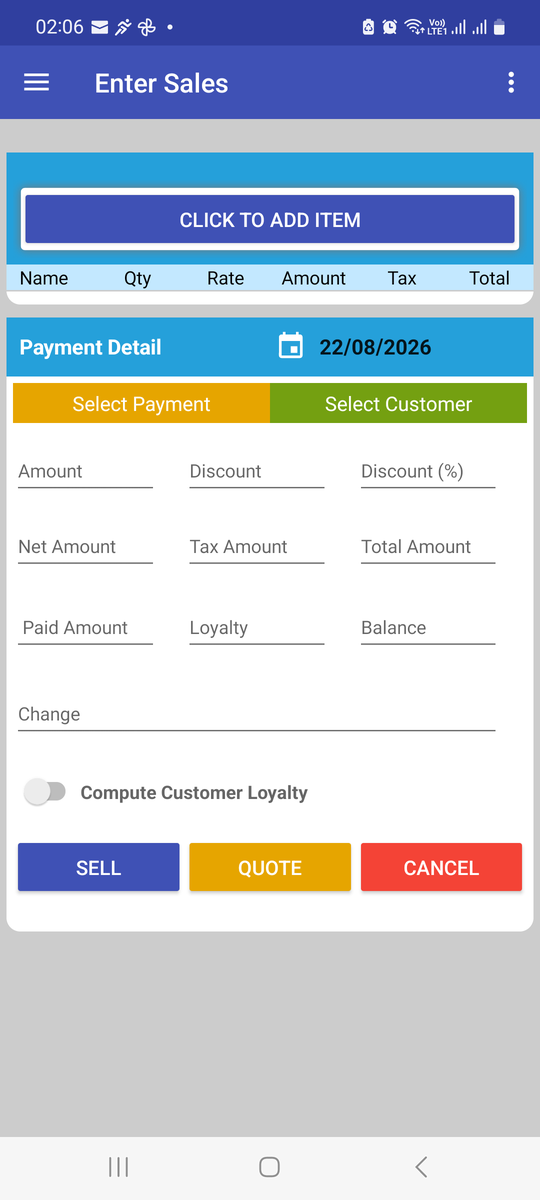
- Enter Date, Select Payment (payment type) and Select Customer. The customer picker has Add New Customer.
- CLICK TO ADD ITEM. Search the item (or Add New Item), then set Quantity, Unit Price and Apply Tax YES/NO. Amount, tax and total calculate themselves. Add. Repeat for each line; tap a line to delete it.
- Totals: Discount (amount) or Discount (%), then Net, Tax and Total.
- Paid Amount — what the customer is paying now. Balance shows what stays on account; Change what to hand back.
- Loyalty — Compute Customer Loyalty shows the customer's loyalty balance; enter an amount to redeem (it can't exceed their balance).
- Sell saves a sale ("Sales Is Posted Successfully"). Quote saves a quotation. Cancel discards.
A quotation can't carry a discount amount or a paid amount — add those when it's converted to an invoice.
10. Invoices and the Sales List
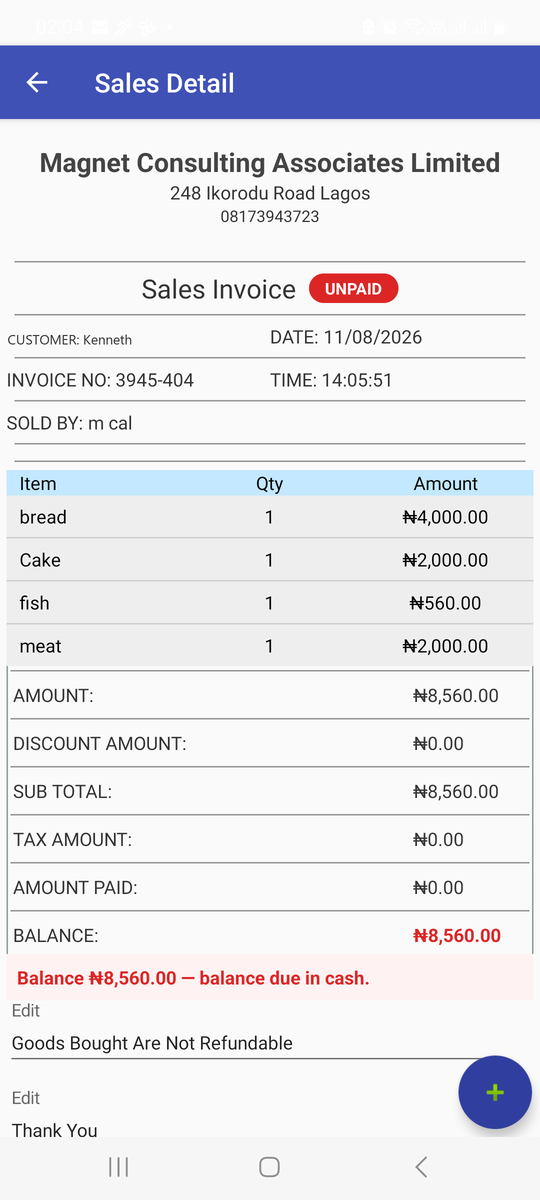
Sales List (Sales group) lists every sale on the phone — customer, date, amount and amount paid. Tap one to open the invoice.
| Button | What it does |
|---|---|
| PAY BALANCE | Collect Payment for what's still owed (see section 8.4). If the customer already has credit with you (they've paid ahead), the list also offers Pay from Balance (credit): it settles the invoice from that credit without recording new money, so the books stay right. |
| COPY | Copies the payment details (bank name and account) so you can paste them into a message. |
| Edit lines at the foot | Two short lines printed at the bottom of the invoice — a thank-you, a return policy. Type over them; they're kept for your next invoices. |
| Choose a paired Bluetooth / thermal printer and print (section 26.3). | |
| Share / Download Invoice | Builds a PDF and opens Android's share sheet — WhatsApp, Gmail, Drive, Save to Files, Bluetooth. |
| Delete | Deletes the sale, if you have the right. A sale that has payments against it must have them removed first ("Cannot Delete Sales. Delete All Receipt on sales"). |
Tapping the customer's name on the invoice opens their transaction list — useful for editing their details or loyalty (section 12).
11. Quotations
Quotation List shows every quotation — customer, date, amount. Tap one for the Sales Quotation screen (QUOTE NO, raised by, lines and totals).
| Button | What it does |
|---|---|
| Invoice | Converts the quotation into a sale. Stock drops and the balance lands on the customer's account at this point, not before. |
| Share / Download Quote | A PDF quote, with "To accept, pay…" and your payment details. |
| COPY | Copies the payment details. |
| Delete | Removes the quote (needs the right). |
A quote made on this phone must sync before it can be converted: "This quote hasn't synced yet — convert it after the next sync."
12. Customers
12.1 Customer Center
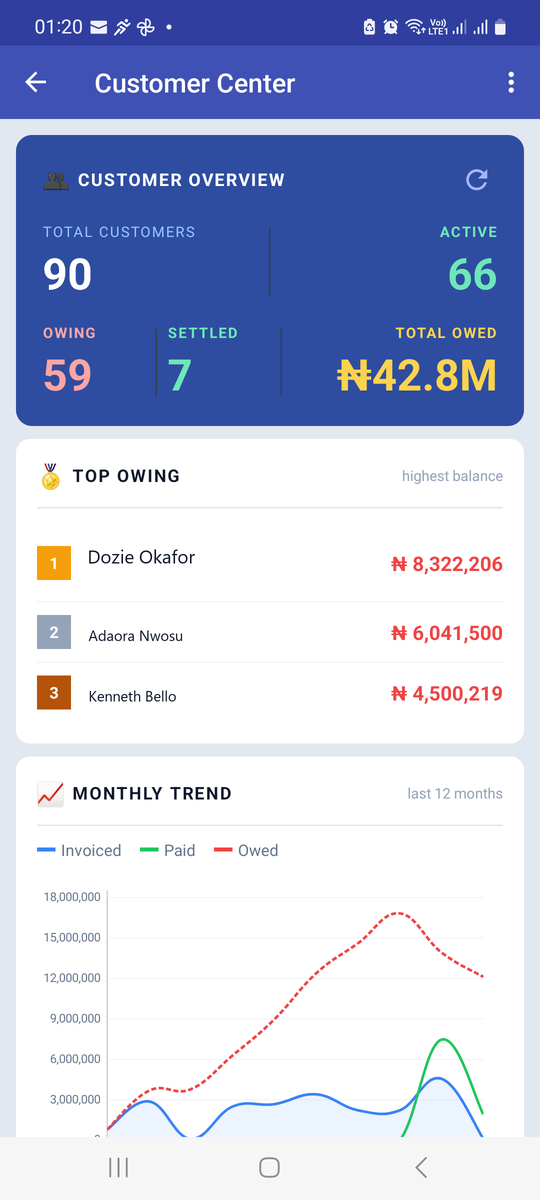
- CUSTOMER OVERVIEW — Total Customers, Active, Owing, Settled, Total Owed.
- TOP OWING — highest balances first.
- MONTHLY TREND (last 12 months) — Invoiced, Paid and Owed together. The gap between Invoiced and Paid is your collection problem, drawn.
- ALL CUSTOMERS — search by name or phone; tap one for their profile.
12.2 Customer Profile
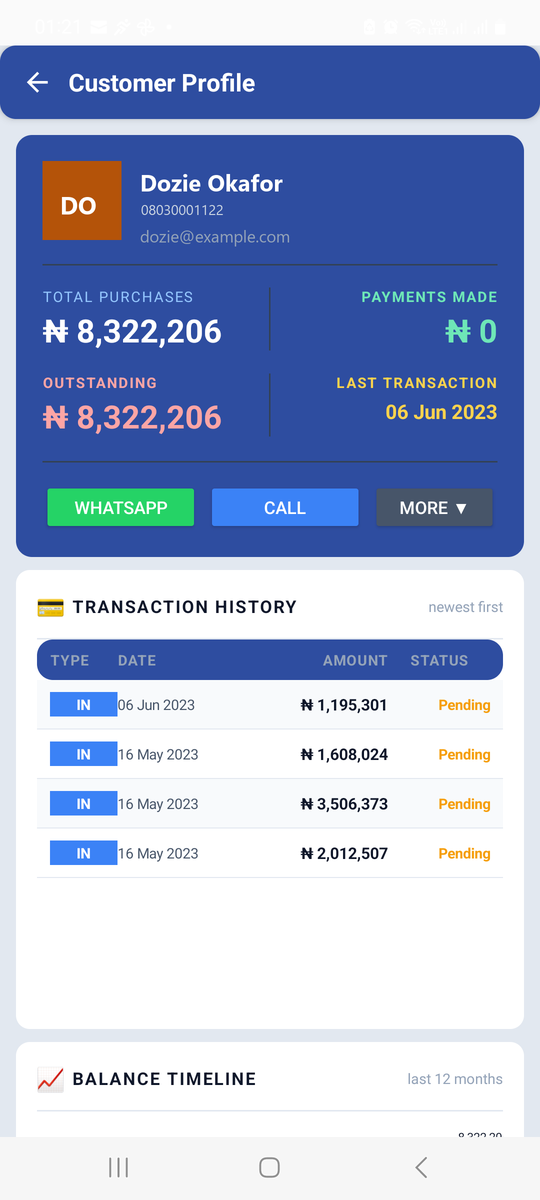
- Header: OWING badge, Total Purchases, Payments Made, Outstanding, Last Transaction.
- WhatsApp and Call — one tap to reach them ("No phone number on file" if there isn't one).
- More ▼ → Add Payment or Transaction List.
- TRANSACTION HISTORY (newest first) and BALANCE TIMELINE (last 12 months).
- Tap a payment in the history to re-issue its receipt or void it (if it was recorded in error).
12.3 Adding and editing customers
Customers (Sales group) is the searchable list. Add Customer opens Create Customer:
| Field | Notes |
|---|---|
| Name | Required; must be unique. |
| Email, Phone No. | Optional, but each must be unique. A phone number makes WhatsApp, calls and SMS follow-up possible — collect it. |
| Address | Optional. |
| Date of birth | Day and month is enough. Powers birthday messages. |
| Wedding Anniversary | Optional; for anniversary messages. |
Add To List queues the customer; add several, then Save List (on the phone) or Save And Sync List (and send them up now). To edit, open the customer's transaction list from an invoice and choose edit, or edit on the website.
13. Collecting payments
Four ways to record money received — all do the same thing to the books:
| From | Best for |
|---|---|
| Sale Center → Collect Payment / Collect › on an invoice card | The counter, one tap. |
| Invoice → PAY BALANCE | Paying a specific invoice. |
| Customer Profile → ADD PAYMENT | A payment on account, or a deposit. |
| Customer Payment (Sales group) | Several payments in a row: pick a Transaction Date, search the customer, enter the Amount and Payment Type, Save. The list shows each customer's outstanding, payment and new balance. |
After collecting, the app offers a Payment receipt to share or download. Sharing receipts is a metered action on the Freemium plan ("Top up your wallet or earn tokens to share receipts" means your usage units have run out — see section 25).
14. Payment Types
Payment Type (Sales group) lists how customers pay. Enter New Type → Save to add one. Tap a type to set its Payment instructions — "Shown on unpaid invoices paid via Zenith Bank": bank name, account name and number. Delete with the bin (asks to confirm). Keep these the same as on the website; see the Store Setup, Users & Security guide, section 8.
15. Items and stock
15.1 Inventory Center
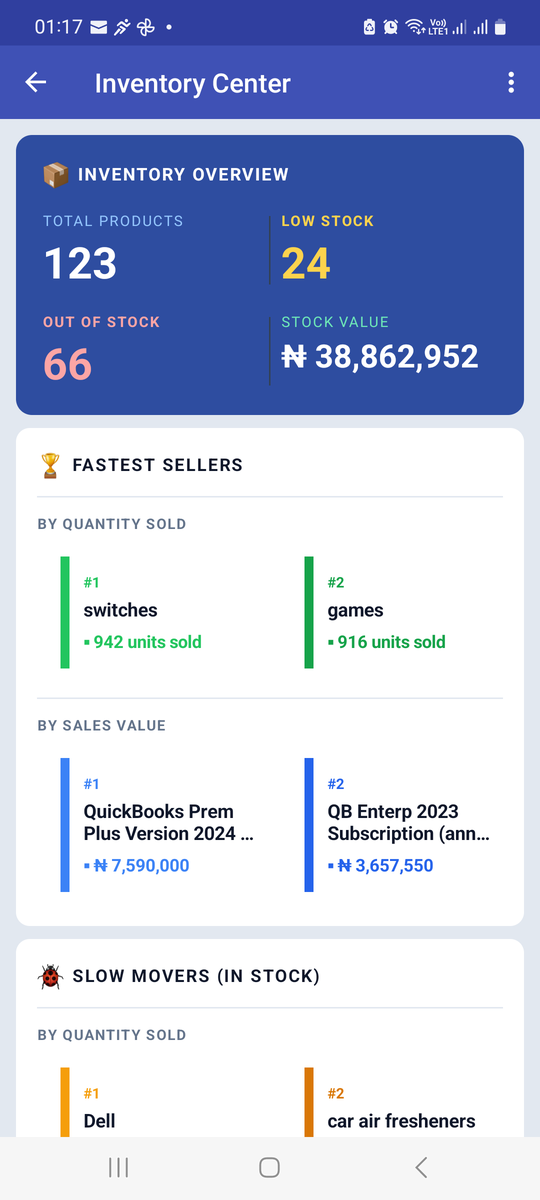
- INVENTORY OVERVIEW — Total Products, Low Stock, Out Of Stock, Stock Value.
- FASTEST SELLERS — by quantity sold and by sales value. High-volume cheap lines and low-volume valuable ones are different businesses; this shows both.
- SLOW MOVERS (IN STOCK) — money sitting on your shelves.
- STOCK MOVEMENTS — the last 6 months, in and out.
- INVENTORY ITEMS — search by name or code; ITEM, CODE, QTY, PRICE, STATUS. Tap one for Item Detail.
15.2 Inventory List and adding items
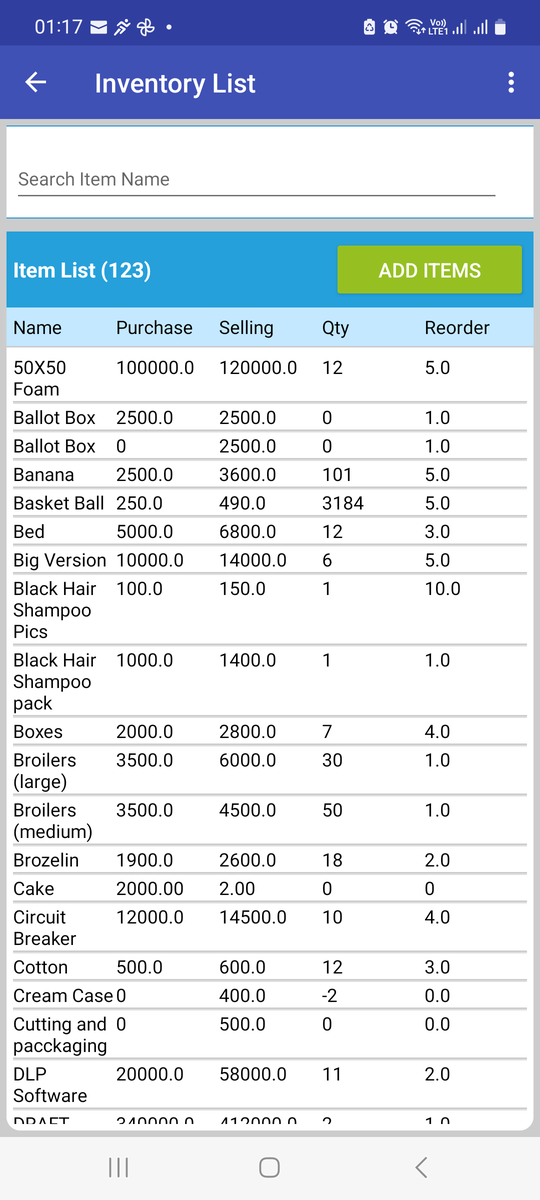
Add Items opens Item Entry:
- Choose Product (has stock) or Service (doesn't).
- Item Name, Purchase Rate (cost), Sales Rate (price).
- Opening Stock — what's on the shelf today only. Everything arriving later should be a purchase (section 16).
- Reorder Level — the quantity at which it counts as low stock.
- Tax — tick if the item is taxable. ("Tax Rate Is Not Set: Go to Edit Shop to set tax rate" means the store has no tax rate yet — section 26.)
- Add To List; repeat; then Save List. Names already used are refused.
15.3 Item Detail
Tap any item for its dashboard:
| Part | Meaning |
|---|---|
| CURRENT STOCK · REORDER LEVEL · TOTAL SOLD · STOCK VALUE | Units on hand, the minimum threshold, units sold, and value at cost ("@ NGN 1,200 / unit"). |
| STOCK HISTORY | The last 15 movements — date, type (Purchase, Sale, Adjustment…), quantity and running balance. |
| STOCK LEVEL TREND | Running stock over the last 6 months. |
| ✏ Edit Item | Change name, prices, reorder level. |
| 📦 Restock ▼ | Add Purchase or Add Adjustment for this item (section 16). |
16. Purchases and adjustments
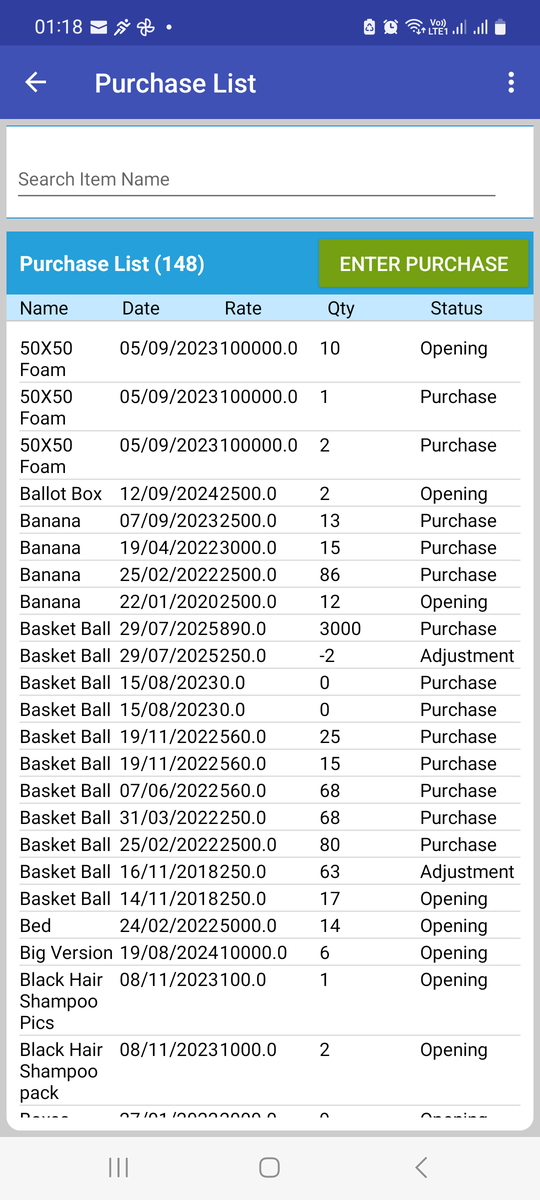
Purchase List shows every stock entry with its Status: Opening (starting stock), Purchase (bought, with a cost) or Adjustment (a correction). Search by item name. A wrong entry can be deleted (confirm when asked).
16.1 Recording a purchase
Enter Purchase (or Sale Center → Add Stock, or Item Detail → Restock → Add Purchase):
- Enter Date and the Item Name. Current Quantity shows what's on hand.
- New Quantity — how many arrived. Purchase Price — the cost of one unit, not the total.
- Sales Price is shown for reference — "Set on the item — not changed by this purchase".
- Add Quantity / Save. Reset clears the form.
16.2 Recording an adjustment
Item Detail → Restock → Add Adjustment opens Adjust Quantity: enter the Difference (positive to add, negative to remove) and the app shows the New Quantity. Use it after a stock count, or for damage and expiry.
17. Expenses
- Expense Class — your spending categories (Rent, Fuel, Salaries…). Add Expense Class → Name and Description → Add To List → Save List.
- Expense — the list of expenses (search by name). Add Expense → Enter Date, Select Expense Class, Amount, Description → Add To List → Save List or Save And Sync List.
On the phone an expense is recorded as paid, with no vendor. For bills you'll pay later, or to keep a supplier's account, record the expense on the website — see the Expenses, Vendors & Budgets guide.
18. Scan a document
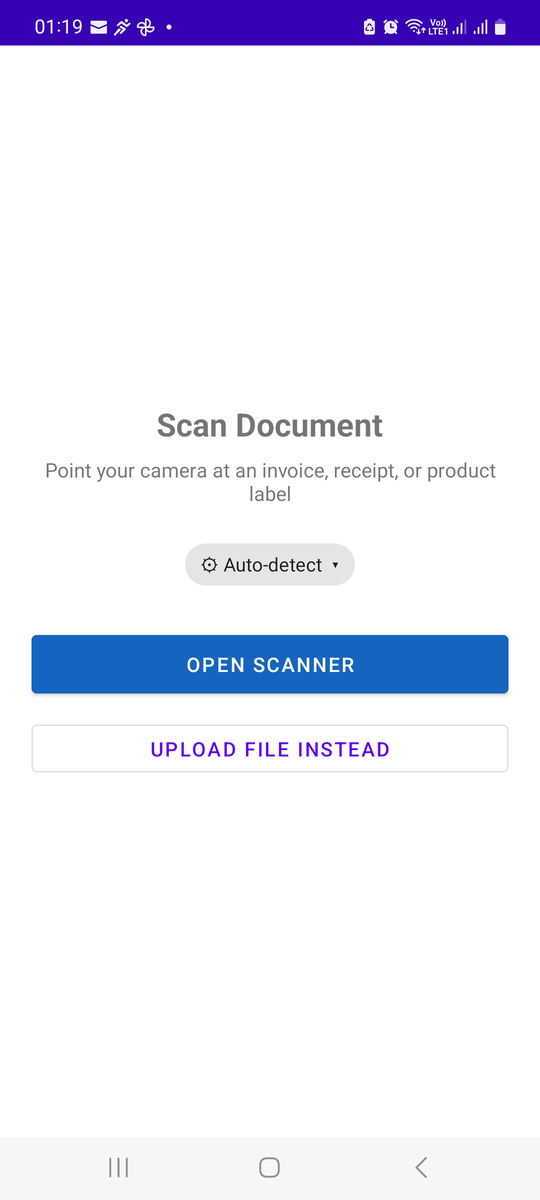
- Photograph a written or printed sheet — a sales book page, a supplier invoice, a receipt — and the app reads the names and numbers off it.
- The document type defaults to Auto-detect; tap it to choose the type yourself when the sheet is ambiguous.
- Open Scanner uses the camera; Upload File Instead takes a photo from the gallery.
- Nothing is saved until you've checked the result. Every line can be corrected, re-matched or removed first.
- Scanning uses usage units per page on the Freemium plan.
The review stage — matching read lines to your items, the prices-versus-quantities question, and the cross-checks that catch a dropped line — is documented in full in the Upload & Scan guide. Read it before your first real scan.
19. Customer Follow-Up and SMS
The same audiences as the website — Open Balance, Gone Quiet, Bought Once, Birthdays — drawing on the same SMS unit balance.
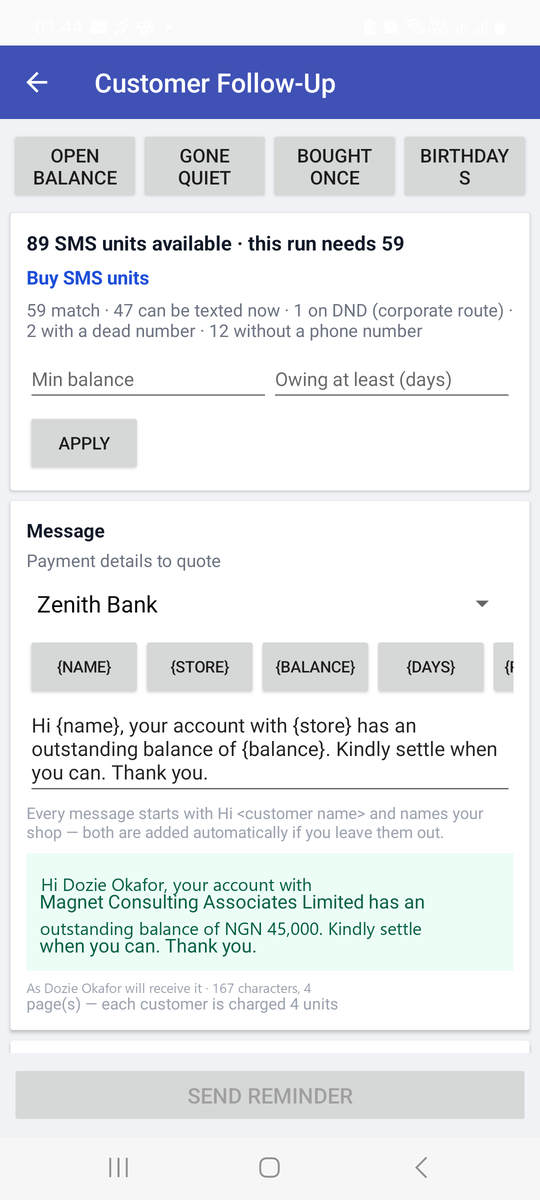
The line under the unit balance is the one to read, e.g.:
59 match · 47 can be texted now · 1 on DND (corporate route) · 2 with a dead number · 12 without a phone number
It separates DND numbers (reachable only on the costlier corporate route) from dead numbers (ones that have already failed delivery — fix them on the customer's record). Everything else — filters, the Payment details to quote dropdown feeding {paymentdetails}, the token buttons, the automatic greeting, and the live preview with its character and page count — works as documented in the Customer Follow-Up guide.
To reach one customer without spending SMS units, use the WhatsApp button on their card in Sale Center or on their Customer Profile.
19.1 Automatic Messages
In the app update after version 1.0.8. The screens match the website's — the pictures in the Customer Follow-Up guide, section 12, show the same form.
☰ → Sales → Automatic Messages lists the texts that go out by themselves — a thank-you after each purchase, a note when a customer pays what they owe, or a message on a date you choose. They are the same messages as on the website: one set up on the phone is listed on the website, and the other way round.
- Each message has a switch. Turning it on shows what it would cost in SMS units and asks you to confirm; turning it off warns that anything waiting to go out is cancelled. The switch only moves once the server has agreed, so it never shows "on" for a message that isn't.
- + Add a message lets you pick a ready-made one (thank-you, first-time welcome, payment on account, a date message), then edit it: the name, when it goes, the wording (with buttons for the customer's name, your shop, the amount and the date), and a live preview with the cost.
- Advanced options hold the same settings as the website, including Skip if the sale reaches us more than N days late — a sale rung up offline reaches the server when the phone next syncs, and a thank-you weeks late is skipped (0 = never skip).
- Edit and Delete sit under each message.
After a sale in Quick Sell: while your shop has no purchase message, the app asks once "Thank your customers automatically?" before opening the sale. Turn on shows the cost and asks you to confirm; Not now hides the question for 30 days; pressing back just carries on to the sale. Quotations never ask.
Not in the app yet (website only): the dashboard card, the Msg button for one customer, the ready-made wording list, and the recent-activity list.
20. Wildfire on the phone
Wildfire (Sales group) — "Get more customers using your existing customers" — gathers the storefront actions:
| Button | Does |
|---|---|
| Publish Item | Put items on your online store. |
| Item Category | Group published items into categories. |
| Share Items | Pick a published item and share it — by WhatsApp and other apps, or as an SMS to your customers (using SMS units). |
| Setup | Store setup: name, banner, stock settings. |
| View Orders | Orders placed on your storefront. |
| Set Delivery Fees | Delivery locations and charges. |
| Share Store Link | Send your whole store's link. |
| Share Customer Loyalty Card | Choose a customer and share their loyalty card. |
Most of these open the same pages as the website inside the app, so they need an internet connection ("No Internet Connection" otherwise). The Merchant Storefront guide covers each in depth.
21. Reports
All seven reports work offline, from the phone's own records.
| Report | Shows | Controls |
|---|---|---|
| Sales Report | Each sale — date, customer, amount — and the total. | From / To dates |
| Daily Sales Report | One day's takings by payment type, with the total — the end-of-day tool for reconciling the cash drawer and the bank apps. | Date |
| Inventory Value Report | Each item's quantity, price and value, and the total stock value. | — |
| Profit And Loss Report | Sales, Cost of Sales, Expenses and the Profit/Loss line. Tap Cost of Sales for its Breakdown: every sale line with its type, date, item, average cost, quantity and amount. | From / To dates |
| Expense Report | Spending totals by expense class. | Search by name |
| Tax Report | Each invoice's amount and tax, and the Total Tax. | From / To dates |
| Customer Follow Up Report | "You have (n) Customer(s) to follow up": customers who normally buy every month but haven't since last month, those who buy every week but haven't since last week, and other customers quiet since last month. | Follow Up On (which group) |
22. Offline, sync and your data
22.1 How it works
Every sale, payment, purchase and customer is written to the phone first, whether or not there's a network. When a connection is available the app pushes those records to the server, and fetches changes made elsewhere. The badge on Sale Center and Main Dashboard tells you where things stand:
| Badge | Meaning |
|---|---|
| ✓ Synced (green) | The server has everything this phone has. |
| ↻ Syncing… | A sync is running. |
| ↻ Sync now (amber) | There are records on the phone the server hasn't got. Tap to sync. |
22.2 The sync controls
| Control | What it does |
|---|---|
| Auto-Sync Interval (Settings) | How often the app syncs by itself: every 2, 5, 10, 15 or 30 minutes (recommended), every 1 or 2 hours, or Disabled (manual sync only). Shorter keeps devices closer together; longer saves battery and data. |
| Download (Update From Web) | Start Syncing pulls the current picture from the server — items, prices, customers and records entered on the website or other devices. |
| Validate Data (Settings) | Checks every sale on the phone for a customer, payment type or item that's missing from the phone, and creates a stand-in for each — named, for example, System Customer 123, System Item 456 or System Payment Type 80 — so no record is left pointing at nothing. It reports what it created, or "Process Completed: No Item Generated". |
22.3 When the phone and the website disagree
It's almost always a sync gap, not a fault. Tap the badge so the phone's records go up, then run Download so the website's come down. Only if a difference survives both is it worth raising with support.
23. This Sales Point
A sales point is a till. On the website you pick one at each sign-in; a phone is bound to one, which is why it can keep selling without a network — it already knows which till it is.
This Sales Point (Admin Management) shows the till's NAME, STATUS, and the dates it last synced up and down. Invoice numbers carry the sales point, so you can tell a phone sale from a web sale in the Sales List.
24. Users and admin
| Menu item | Use |
|---|---|
| Admin User | The owner's own name, email and password. "Only Admin can edit this" for anyone else. |
| Other Users | The store's staff accounts. Create User (first name, last name, email, password) and Delete. |
| User Permissions | Explains that permissions are managed in the web portal, on the user's profile. Changes reach the phone at the next sync, and the app tells you when its permissions have been updated. |
The same permission list governs the website, the phone and the desktop till — a right removed on the web is removed on the phone. See the Store Setup, Users & Security guide, section 12.
25. My Usage, Invite & Earn, Subscription
| Menu item | What you'll find |
|---|---|
| My Usage | Monthly usage left and Your units; Buy usage units (the app shows how many you'll receive for an amount and opens a secure payment page); Redeem units for subscription days. |
| Invite & Earn 500 Usage Units | Shares your personal invite link. You earn usage units for every shop that joins through it. |
| Subscription | Your plan on this device, Please Subscribe, and Check Subscription Update Online (use it after paying on the website so the phone picks up the new plan). |
If a paid plan ends, the app offers Continue on the Free plan, Redeem usage units for days, or subscribing again. Everything about plans, units and invites is explained in the Usage, Billing & Help guide.
26. Settings, printing and updates
26.1 Edit Shop
Shop Name, Phone, Website, Address, State, Currency and Tax Rate (%) — as they appear on invoices. Needs an internet connection; you'll be asked to confirm. Changing the currency changes the label only, never the amounts.
26.2 Version
Shows the Installed Version. Check For New Version; if "There is a new Version of SmartShop", tap Download, then Done Updating. Have the version number ready when you contact support.
26.3 Printing receipts
- Pair the Bluetooth or thermal printer in Android's own Settings → Bluetooth first.
- Open an invoice → Print.
- Choose the printer from the list and Print.
The app can only use a printer the phone already knows. If it's missing from the list, pair it again in Android settings.
27. Android vs web
| Capability | Android | Website |
|---|---|---|
| Works with no internet | Yes — saved on the phone, synced later | No |
| Quick Sell with typed quantities and prices | Yes | No |
| Daily Sales Report by payment type | Yes | Use Receipts / Cash Collections |
| Cost of Sales breakdown in the P&L | Yes | No |
| Camera scanning | Camera, in your hand | Upload a photo |
| WhatsApp / call a customer | One tap from their profile | Link only |
| Bluetooth / thermal printing | Yes | Via the PC's printer |
| Expenses with vendors and part-payments | No — paid expenses only | Yes |
| Budgets, Transaction Classes, Login Audit | No | Yes |
| Setting user permissions | No — read from the web | Yes |
| Sales point | Bound to the device | Chosen at each sign-in |
| Consolidator (several stores) | No | Yes |
| Bulk spreadsheet upload | No | Yes |
| Storefront | The main actions (opens the web pages in-app) | Everything |
In practice: sell on the phone, administer on the web. The phone is better at the counter, on a delivery round and in a market; the website is better for bulk data, suppliers, budgets, permissions, multi-store and anything involving a spreadsheet.
28. A day on the app
Kenneth runs a hardware shop with one phone at the counter.
- Open: sign in; check the badge is green. If the owner changed prices on the website last night, run Download.
- Serve: walk-ins through Quick Sell (2 hinge @450…); regulars on credit with the customer attached. Quotes for contractors saved with Save Quote.
- Deliveries: Sale Center → Add Stock, entering the unit cost from the supplier's invoice.
- Chasing: from Sale Center's quiet-customer strip, a WhatsApp to anyone overdue; a contractor pays part of his balance — Collect › on his invoice, receipt shared on the spot.
- Close: Daily Sales Report → today → compare the Cash line with the drawer and each transfer line with the bank app. Tap the badge; wait for ✓ Synced.
29. Quick reference and troubleshooting
| I want to… | Do this |
|---|---|
| Sell something fast | Sale Center → New Sale, or ☰ → Quick Sell |
| Sell with full detail, or quote | ☰ → Enter Sales / Quotation |
| Turn a quote into a sale | Quotation List → the quote → Invoice |
| Take money off an old debt | Sale Center → Collect Payment, or the invoice → PAY BALANCE |
| Send an invoice or receipt | Invoice → Share / Download Invoice |
| Print a receipt | Invoice → Print (pair the printer first) |
| Add a product | Inventory List → Add Items |
| Record a delivery | Sale Center → Add Stock, or Purchase List → Enter Purchase |
| Correct stock after a count | Item Detail → Restock → Add Adjustment |
| Record an expense | ☰ → Expense → Add Expense |
| Enter a paper sheet | Sale Center → Scan Doc |
| Chase a customer now | Customer Center → the customer → WhatsApp or Call |
| Text a whole group | ☰ → Customer Follow-Up |
| Check the day's takings | Report → Daily Sales Report |
| Make sure nothing is stranded | Check for ✓ Synced |
| Pull down what was done on the web | ☰ → Download → Start Syncing |
If something looks wrong
- The badge isn't green. The phone has records the server hasn't got. Get online and tap it.
- The phone shows different figures from the website. Sync, then Download. A gap that survives both is worth reporting.
- A sale isn't on the customer's account. It was saved to Cash — walk-in.
- Stock didn't drop. It was saved as a quotation — convert it with Invoice.
- "This sale/quote hasn't synced yet". Tap the badge, then open it again.
- "You don't have permission to open that screen". Ask the owner to tick that right on the website; it arrives at the next sync.
- Sign-in fails after a password reset. The first sign-in with a new password must be online.
- Auto-sync never seems to run. Check Auto-Sync Interval isn't Disabled, and allow the app to ignore battery optimisation.
- Names like "System Item 456" appear. Validate Data created them — rename them (section 22.2).
- The printer isn't listed. Pair it in Android's Bluetooth settings first.
- Profit looks too good. P&L → tap Cost of Sales → look for lines with an average cost of 0.
- Sharing a receipt asks you to top up. Your usage units have run out — see My Usage.