The Desktop (Windows) till
The Windows till: barcode scanning, receipt printers, expiry-dated stock, and a counter that keeps selling when the internet doesn't.
MatSmartShop Desktop is a full Windows application for a PC at a fixed till. It uses the same account, items, customers and permissions as the website and the Android app, but keeps its own database on the PC, so it works fully offline and syncs whenever it's online. It's part of the Business plan (see the Usage, Billing & Help guide).
1. Installing and updating
- On the till PC, open updates.matsmartshop.com (or the website's Downloads → Download Desktop Version).
- Run setup.exe / use the install button. Don't open the .application file directly — it won't install properly that way.
- The app installs for your Windows user and adds a Start Menu shortcut under Magnet Group → MatSmartShop.
It updates itself from the same site. Settings → Version shows the Installed Version; Check For New Version, then Download if one is offered, and Done Updating.
The login screen shows the version and whether the app is pointed at the live or a test server — useful to quote to support.
2. First sign-in on a PC
A new PC has no store on it yet, so the first sign-in fetches it (needs internet):
- Connect to Store — "Use your remote store on this device also." Enter your MAT Smart Shop email and password and Connect.
- Store Information shows the store name, email and Store ID. If it's yours, Continue to start setting up. If your account has several stores, choose which one this PC belongs to — one store per PC.
- Sales Point Setup — "Select a sales point to continue". Pick this till from the list, or create one: New Sales Point → Sales Point Name (e.g. "Main Counter PC"); the This Device ID field identifies the PC → Save and Continue.
- The app downloads your data and opens the main window.
From then on, the Login screen ("Enter a valid email and password to login") works offline. Every sign-in is recorded in the store's Login Audit on the website, with the channel desktop.
3. The main window and menu
The title bar shows MAT SMART SHOP, and the status area shows the Sales Point, Store Id and Name. "This system is not connected to a Sales Point" means setup isn't finished (section 2).
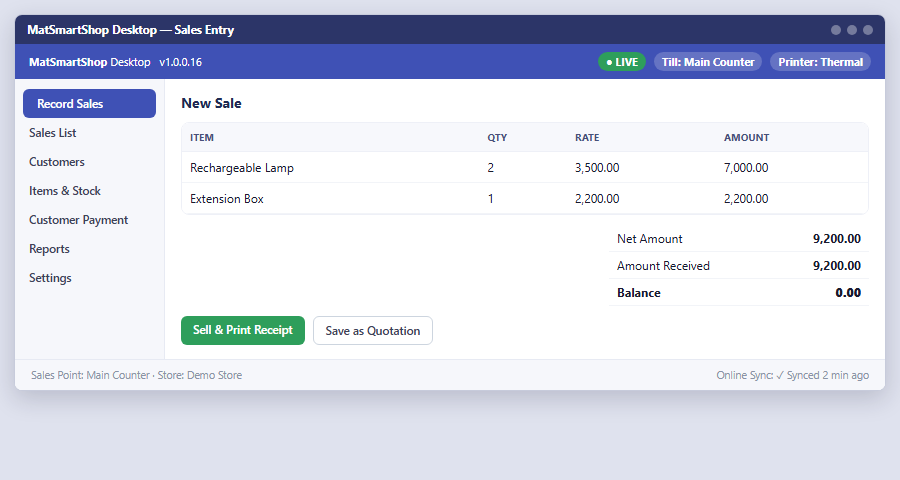
| Menu | Items |
|---|---|
| Dashboard | The day's sales at a glance. |
| Sales & Customer | New Sale & Quotation · Customer Info & Transaction · Sales & Quotation List |
| Items & Purchases | Item Info & Management · Purchase & Adjustment · Item Purchase Batch |
| Expenses | New Expense · Expense List · Expense Type |
| Vendor & Transactions | Vendors and what you owe them. |
| Payment Types · Transaction Class | Setup lists. |
| Sync Data | Download Data · Upload Data |
| This Sales Point | The till's status and last sync times. |
| Settings | Printer Settings · Auto Sync · Drop Database · Version |
Staff see only what their permissions allow. Permissions are set on the website (Edit User) and arrive at the next sync.
4. New Sale & Quotation
- Date — today unless you change it.
- Transaction Class — if your store uses classes.
- Customers — pick one (search in Select Customer), or + to create one. Leave on the walk-in customer only for sales paid in full.
- Payment Type — how they're paying (+ adds a new type).
- Transaction Type — SALES or QUOTE.
- Add items: scan them into the Barcode box (section 5), or + Add Line Item → Select Item (search the Item List). Adding an item that's already on the sale is refused — "Item already added. You can increase item quantity" — change the quantity on the line instead.
- Totals panel: Amount, Discount or Discount %, Net Amount, Tax Amount, Invoice Amount.
- Amount Received — what the customer handed over. Balance shows what stays on their account; Change what to give back.
- Apply Customer Loyalty — redeem the customer's loyalty balance against this sale.
- Save, or Save and Print Invoice. Clear starts again.
| Refusal | Fix |
|---|---|
| Please Enter date / Please Select Customer / Select Payment Type | Fill the missing box. |
| Please add line item | The sale is empty. |
| Please ensure that quantity is enter for line items | A line has no quantity. |
5. Barcode scanning
A USB barcode scanner works like a keyboard: click into the Barcode box and scan.
- Scanning an item's barcode adds it to the sale; scanning it again adds another unit.
- "This item barcode has not been registered" — the barcode isn't linked to any item yet. Register it (section 8.2).
- To change a line's quantity by scanning, open the line: tick Scan In to add units with each scan, untick to scan out (remove) units. "This item is not on the sale" means you're scanning out something that was never added.
- Expiry-tracked items are sold by scanning their batch code, not the product barcode — "This is a batch-tracked item. Please scan its batch label instead of the product barcode." An expired batch is refused: "This item has expired with the expiry date: …" (section 9.3).
6. The Sales & Quotation List and editing a sale
Sales & Quotation List: filter by From/To dates and Type (sales or quotations), or search. + New Sales & Quote starts one.
Open a sale for Sales Details: the same layout as New Sale, where you can adjust lines and payment and Save, or Print the invoice. To turn a quotation into a sale, convert it from the website's Sales & Quotation List (or the Android app's Quotation List → Invoice) after this PC has synced; the converted sale comes back down at the next download.
7. Customers and payments
- Customer Info & Transaction → Customer List, with search. + New Customer: Customer Name, Email, Phone, Address, Birthday and Wedding Anniversary → + Add To List (repeat) → Save.
- Open a customer for their Customer Transaction List — invoices and payments with the running balance.
- Customer Payment: Date, Amount Received, Payment Type → Save. The payment reduces their balance and syncs up like everything else.
8. Items and barcodes
8.1 Item List and new items
Item Info & Management → Item List (search; Edit, Barcode and Delete buttons on each row). + New Item:
| Field | Notes |
|---|---|
| Item Name, Item Type | Product (stocked) or Service. |
| Purchase Rate, Sales Rate | Cost and selling price. |
| Quantity Available | Opening stock only — later deliveries go in as purchases. |
| Low Stock Reminder Level | The reorder point. |
| Barcode | Scan the product's barcode into this box. |
| Track Expiry Date | Tick for perishable or dated goods (medicines, food, cosmetics). Then set Batch Name, Expiry Date and Expiry Reminder In Days for the opening stock. See 9.3. |
8.2 Registering a barcode on an existing item
Item List → the row's Barcode button → scan the barcode → save. From then on scanning it at the till adds that item.
Stock Details for an item shows every movement in and out — the answer to "why does it say I have this many?"
9. Purchases, adjustments and batches with expiry dates
9.1 Purchase & Adjustment
Purchase List (search) → + Purchase & Adjustment opens New Purchase & Adjustment:
- Date, Item (Available Qty. shows what's on hand).
- Movement Type: Purchase, Stock Adjustment-Add or Stock Adjustment-Remove.
- Quantity, Purchase Rate (cost of one unit) and Sales Rate.
- For a purchase: Vendors (+ adds one), Payment Type, Amount and Paid Amount — any unpaid part is added to what you owe that vendor.
- Save.
Deleting a purchase whose stock has already been sold warns you first, because it changes the cost of those past sales.
9.2 Why batches
For items with Track Expiry Date ticked, every delivery is a batch with its own name and expiry date. The till then knows exactly which units are about to expire, and refuses to sell expired ones.
9.3 Receiving and selling batches
- When purchasing an expiry-tracked item you must identify it by scanning ("You must scan barcode for item that track expiry date"), then enter a Batch Name ("Please enter batch name") and Expiry Date ("Please select expiry date"). Scanning an existing batch shows its Available Batch Quantity.
- Each batch gets a batch code. Label the stock with it: at the till, expiry-tracked items are sold by scanning the batch code.
- Item Purchase Batch → Select Item lists that item's batches; open one for Batch Detail — every movement in and out of that batch.
10. Expenses and vendors
- New Expense: Date, Transaction Class, Expense Type (+ adds one), Bill Amount, Remark, Vendors, Payment Type and Amount Paid → Save. Anything not paid is owed to the vendor.
- Expense List (search) and Expense Type list.
- Vendor & Transactions → Vendor List (+ New Vendor) → open a vendor for their transactions → Vendor Payment: Date, Payment Type, Amount Paid → Save.
These work exactly as on the website; see the Expenses, Vendors & Budgets guide.
11. Payment Types and Transaction Classes
Payment Type List (+ New Payment Type) and Transaction Class List (+ New Transaction Class) — the same lists as the website; see the Store Setup, Users & Security guide, sections 8–9.
12. Printing
Settings → Printer Settings: Choose Printer Type, Select Printer, Save.
| Printer Type | Prints | Use with |
|---|---|---|
| Thermal Printer | A narrow till receipt. | A roll receipt printer at the counter (USB or Bluetooth). |
| Other Printers | A full A4 invoice. | An ordinary office printer. |
Choose the type that matches what's physically connected — the wrong type prints garbled output. Install the printer in Windows first; then it appears under Select Printer. Print from Save and Print Invoice or a sale's Print. A Test Print is available from the support tools.
13. Sync: upload, download and Auto Sync
13.1 Auto Sync
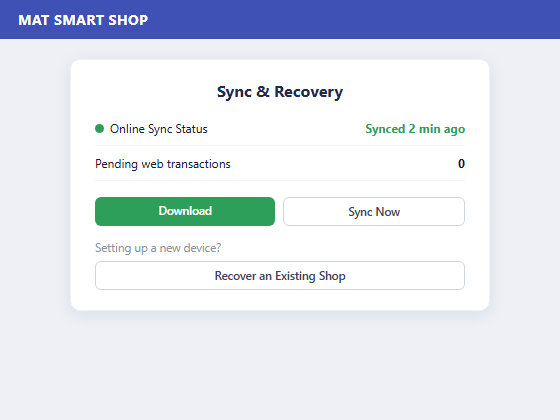
Settings → Auto Sync:
- Enable automatic sync, and Sync every n minutes. Transactions are uploaded and server changes downloaded automatically whenever the internet is available.
- Sync Now runs one immediately.
- The history line shows the last sync ("No sync has run in this session yet" just after opening).
- View Log shows the sync log; Send Log packages it for support and opens a pre-filled email — the fastest way to get a sync problem solved.
13.2 Manual sync
- Sync Data → Upload Data ("Upload Data To Web") — send this PC's new records up now.
- Sync Data → Download Data ("Download Data From Web") — bring down what's changed on the website or other devices: new items, prices, customers, permissions.
"This system cannot connect to server. Please check your internet." — keep selling; sync catches up once the connection returns.
14. This Sales Point
Shows the Sales point name, Status, and the dates of the last sync up and down. If "last sync up" is days old, this PC's sales haven't reached the server — find out why before anything else.
15. Subscription, version and support tools
- Subscription — the desktop till needs an active Business plan. If none is found you'll see "You are about to subscribe for Mat Smart Shop on this device"; subscribe on the website, then Check Subscription Online. A flaky connection won't lock you out — the app only blocks when the server confirms there's no active plan.
- Version — section 1.
- Drop Database — deletes all data on this PC ("you will lose all data that exist in this…"), ready for a clean re-setup.
16. Desktop vs website vs Android
| Capability | Desktop | Website | Android |
|---|---|---|---|
| Works offline | Yes | No | Yes |
| USB barcode scanner | Yes | No | No |
| Batches and expiry dates | Yes | No | No |
| Thermal receipt printing | Yes | Browser print | Bluetooth |
| Expenses with vendors | Yes | Yes | Paid expenses only |
| Reports, budgets, storefront, Consolidator, permissions, bulk upload | Use the website | Yes | Reports only |
17. Quick reference and troubleshooting
| I want to… | Do this |
|---|---|
| Ring up a sale | Sales & Customer → New Sale & Quotation → scan → Save and Print Invoice |
| Make a quotation | Same screen, Transaction Type = QUOTE |
| Take a payment on account | Customer Info & Transaction → the customer → Customer Payment |
| Link a barcode to an item | Item List → Barcode |
| Receive stock | Purchase & Adjustment → Movement Type = Purchase |
| Check a batch | Item Purchase Batch → Select Item → open the batch |
| Send today's sales up now | Sync Data → Upload Data (or Auto Sync → Sync Now) |
| Get the web's latest prices | Sync Data → Download Data |
| Send support a sync log | Settings → Auto Sync → Send Log |
If something looks wrong
- "This item barcode has not been registered". Register it on the item (8.2).
- A scan is refused as batch-tracked. Scan the batch label, not the product barcode.
- A scan is refused as expired. Correct — pull that batch from the shelf and record a Stock Adjustment-Remove.
- The printer prints gibberish. The printer type is wrong for the hardware (section 12).
- The web doesn't show today's till sales. Upload, then check This Sales Point's last sync up.
- New prices from the web aren't at the till. Download Data.
- "This system is not connected to a Sales Point". Finish Sales Point Setup (section 2).
- Sync keeps failing. Auto Sync → Send Log.