Seasonal Sales Playbook: Black Friday, Christmas and every festive season
Run festive sales on your online store, step by step: create your free profile, publish your Wildfire store, get customers ready, create offers and coupons, then launch, handle orders, check transfer receipts and bring buyers back.
The Seasonal Sales Playbook shows five steps to run Black Friday, Christmas and every festive season on your Wildfire online store. Each step has three things to do. This guide takes those 15 activities one at a time, in the order you should do them, and explains each one in full.
Examples in this guide use three customers — Dozie, Adaora and Kenneth — the same names used across the rest of the manual set.
New to SmartShop? Start here
You don't need to have used SmartShop before. This guide starts from nothing — no account, no items, no customers — and takes you all the way to your first festive sale. If you already use SmartShop for your shop, you can skip Step 1.
What SmartShop and Wildfire are
- SmartShop is an app for running your shop: what you sell, what you have in stock, who your customers are, and what they owe. It works on the web (store.matsmartshop.com) and on Android.
- Wildfire is the part of SmartShop that gives you an online store — a web page with your products that customers open from a link, order from, and pay on. You set it up from the web.
Have these ready before you begin
| You need | Why |
|---|---|
| An email address you can open now | To confirm your account (Activity 1.2) and to ask for your sender name (3.2). |
| A phone with WhatsApp | Orders can also reach you on WhatsApp (2.3). Every order is saved in SmartShop too, so you can manage it there. |
| A computer or phone browser | Wildfire setup is done on the web. A laptop is easiest for adding many items. |
| Photos of the items you will sell | One clear photo for each item you want to push this season (2.1). |
| Your selling price and cost price for each item | The selling price shows on your store; the cost price lets SmartShop show your profit on an offer (4.1). |
| Your business bank account details | Where online payments are paid out (2.3). |
| A Paystack or Flutterwave account (free to open) | So customers can pay by card, transfer or USSD (2.3). If you don't have one, open it at paystack.com or flutterwave.com early — they may ask for your ID and business details, which can take a few days. |
| Money for SMS units (at least ₦5,000 if you want your own sender name) | Texts to customers are paid with SMS units (3.2). |
Words you will see
| Word | What it means |
|---|---|
| Portal / web app | SmartShop on the web, at store.matsmartshop.com. It has a menu down the left side. |
| Wildfire back office | The screens where you manage your online store. It opens in a new browser tab and has a blue bar across the top (Share Items, Orders, Offers & Coupons, Store Settings, Store Link, Publish Item). |
| Storefront / online store | What your customers see when they open your store link. |
| Publish | Put an item on your online store so customers can see and order it. |
| Freemium plan | The plan every new shop starts on. No subscription to pay. |
| Usage units | A monthly allowance on the Freemium plan. A few actions use them, e.g. checking a transfer receipt. |
| SMS units | What you buy to send text messages. Separate from usage units. |
| Sender name | Your shop's name shown at the top of your texts, instead of the shared SmartShop name. |
| Offer | A discount on items for a set time, e.g. 20% off this weekend. |
| Coupon | A code a shopper types at checkout to get money off, e.g. XMAS10. |
| Affiliate | Someone who shares your store link and earns a part of each order they bring you. |
Finding your way back
After today, you'll come back the same way each time: go to store.matsmartshop.com, sign in, then press Wildfire in the left menu (under Tools) to reach your online store's back office. Most activities in this guide happen in that Wildfire tab. A few (usage units, transfer receipts, automatic messages, Customer Follow Up) are in the left menu of the main portal — each activity says which.
Your season timeline
Two things take time that you can't speed up: your sender name (the phone networks take 1 to 3 working days to approve it) and shoppers signing up for sale alerts (they need to see your store before the sale starts). So start early. Aim to have your store live and your first offer ready by 20 November, a week before Black Friday.
| When | Activity | What you do | Where |
|---|---|---|---|
| Day 1 (as early in November as you can) | 1.1 | Sign up on the web or the Android app | matsmartshop.com → Get started free |
| Day 1 (as early in November as you can) | 1.2 | Confirm your email — no card, no trial clock | The verification email |
| Day 1 (as early in November as you can) | 1.3 | Learn what your plan includes | Account → My Usage |
| Days 1–3 | 2.1 | Open Wildfire, accept the seller terms, add your items with a photo | Wildfire → Publish Item |
| Days 1–3 | 2.2 | Turn items on for your storefront | Publish Item / Share Items |
| Days 1–3 | 2.3 | Connect Paystack or Flutterwave and your WhatsApp number | Store Settings → Setup |
| Days 3–7 (by 15 Nov) | 3.1 | Share your store; ask shoppers to tap Tell me when it's on sale | Store Link / Share Items |
| Days 3–7 (by 15 Nov) | 3.2 | Buy SMS units and ask for your sender name — do this early | Store Settings → Buy SMS Unit |
| Days 3–7 (by 15 Nov) | 3.3 | Turn on Affiliate Marketing and add your fans | Store Settings → Affiliate Marketing |
| By 20 Nov | 4.1 | Choose your deal and the items | Offers & Coupons → New offer |
| By 20 Nov | 4.2 | Set start and end dates and the countdown | Same form |
| By 20 Nov | 4.3 | Make coupon codes, one for each affiliate | Offers & Coupons → New coupon |
| 27 Nov (Black Friday) to 25 Dec (Christmas), then January | 5.1 | Send the offer link and codes | Your offer → Share / Text customers |
| 27 Nov (Black Friday) to 25 Dec (Christmas), then January | — | Confirm orders and turn them into invoices | Wildfire → Orders |
| 27 Nov (Black Friday) to 25 Dec (Christmas), then January | 5.2 | Check every transfer receipt before goods leave | Check a Transfer Receipt |
| 27 Nov (Black Friday) to 25 Dec (Christmas), then January | 5.3 | Bring buyers back, then run the offer again | Automatic Messages / Run again |
Step 1 — Create your free profile
Everything in the playbook runs on one SmartShop account. If you already use SmartShop for your shop, skip to Step 2 — your account and items are already there.
Activity 1.1 — Sign up on the web or the Android app
Day 1 · about 5 minutes matsmartshop.com → Get started free
Activity 1.1: sign up on the web or the Android app.
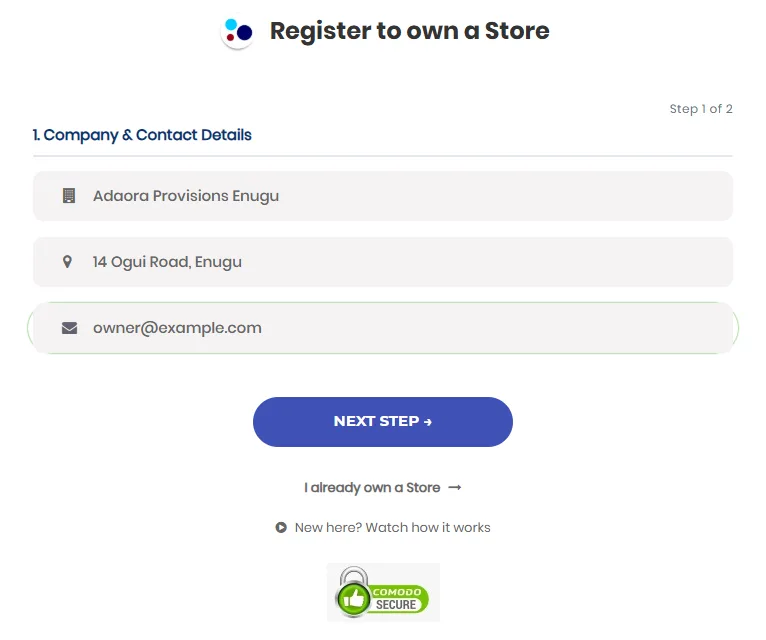
On the web:
- Go to matsmartshop.com and press Get started free (or Create your free profile on the playbook page). The sign-up page opens on store.matsmartshop.com.
- Your business — type your Company / Store Name (this is the name customers see on your online store and in your texts), your Business Address and your Business Email Address. Press Continue.
- About you — type your First Name, Last Name and, if you like, your Phone Number. Choose your Country and State / Region. The Currency fills itself in from the country.
- Choose a Password (at least 6 characters) and type it again in Repeat Password.
- If a SmartShop agent told you about us, type their code in Agent code. Otherwise leave it empty.
- Finish sign-up. You'll see Check Your Email — your shop has been created.
On the Android app: install SmartShop from the Google Play Store, open it and choose to create an account. You fill in the same details. One account works on both — you can sign in on the website later with the same email and password.
Activity 1.2 — Confirm your email (no card, no trial clock)
Day 1 · 1 minute Your email inbox
Activity 1.2: confirm your email.
- Open the email from MatSmartShop called Verify Your Email. Check your spam or promotions folder if it isn't in your inbox.
- Press Verify Email Address. It opens the sign-in page with a message that your email is confirmed.
- Sign in at store.matsmartshop.com with your email and password. If your shop has more than one sales point, pick the one you are working from.
- You land on your Dashboard. The menu on the left is where everything in this guide starts.
You will also get a Welcome email with links to short videos and guides for the web and Android apps.
There is no card to enter and no trial that runs out. Your shop starts on the Freemium plan and stays on it until you choose to pay for a plan.
Activity 1.3 — Know what your plan includes
Day 1 · 2 minutes Account → My Usage
Activity 1.3: know what your plan includes.
On the Freemium plan there is no subscription to pay. Instead you get an allowance of usage units that refreshes every month. Some actions use units (for example, reading a scanned receipt or checking a transfer receipt); most everyday work does not.
- Open Account → My Usage to see how many units you have left and when your monthly allowance refreshes.
- If you run low, you can buy more units on the same page, or earn some through Invite & Earn.
- SMS units are separate. Usage units never pay for text messages — you buy SMS units for texts in Activity 3.2.
Full details: Usage, Billing & Help guide, sections 1–6.
Step 2 — Publish your Wildfire store
Wildfire is your online store. It gives you one link for your whole shop. Customers browse, order, and pay by card, transfer or USSD. You manage every order on the platform (Wildfire → Orders), and you are told about it by the bell in your portal, by email and on WhatsApp.
Activity 2.1 — Add the stock you will sell, with a photo for each hero item
Days 1–3 · 30–60 minutes Wildfire → Publish Item
Activity 2.1: add your items, with a photo for each hero item.
First, open Wildfire. In the left menu of the web portal, under Tools, press Wildfire. It opens in a new browser tab.
The first time only, you see Before you open your online store with two quick steps:
- Seller terms — read them, tick I have read and accept the Seller Terms and the MatSmartShop Terms of Use, and press the button to accept. You'll see Terms accepted.
- Verify your email or phone number — either one is enough. If you clicked the link in Activity 1.2, your email is already verified. Otherwise choose email (we send a link to your store's email) or phone (we text a 6-digit code — type it in). The phone code is free; it does not use your SMS units.
- When you see You're all set, press Continue to your store.
Now choose your hero items. These are the few products you expect to sell most this season — the ones you'll put on offer. Each one needs a clear photo; items with photos sell far better.
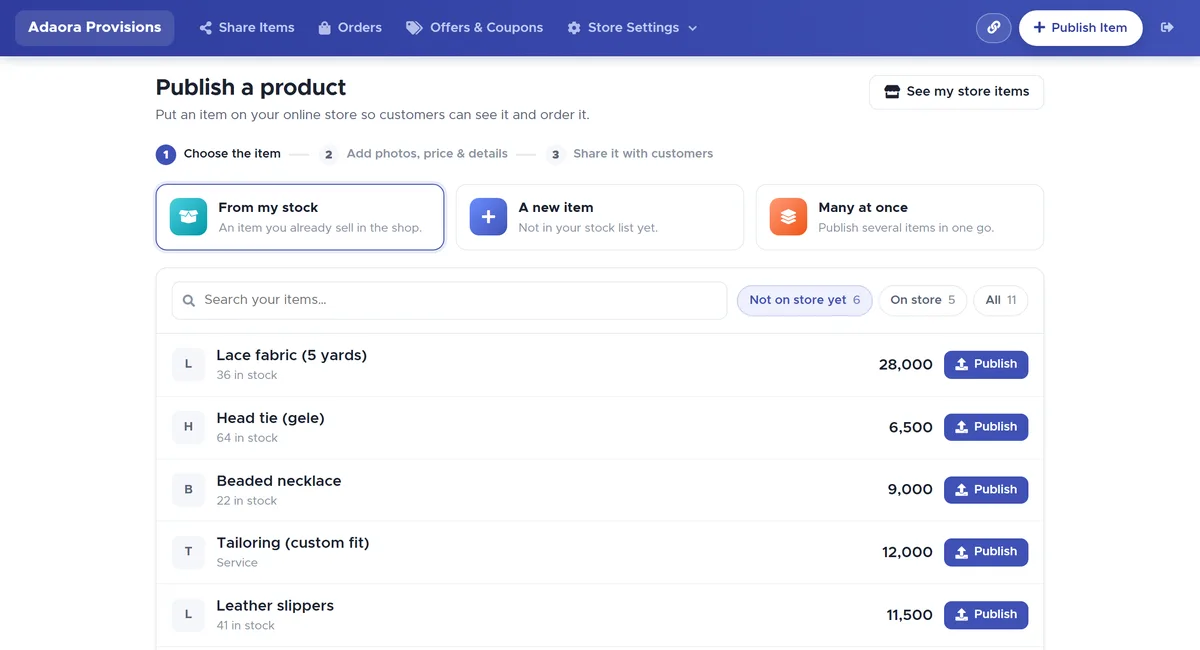
Press Publish Item in the top bar. The page Publish a product has three tabs:
| Tab | Use it when | What you do |
|---|---|---|
| From my stock | The item is already in your shop's stock list. | The list starts on Not on store yet. Find the item (use the search), pick it and continue. Nothing is typed again. |
| A new item | The item is not in your stock list yet. | Type the Item name, say What is it?, type the Selling price and the Cost price, then press Save & continue. |
| Many at once | You are putting a lot of items online in one go. | A grid with one row per item. Set the details for each row and save once. See Activity 2.2. |
Whichever tab you use, you finish on Step 2 of 3 · Photos, price & details:
- Photos — press Add photos. Clear, well-lit photos sell better. The first one is the cover.
- Name customers see — say what it is: "Ankara wrap dress, size 12", not "Item 23".
- Category — pick one, or make one on the spot with New category. Shoppers filter your store by category.
- Show the price and Price — leave your normal price here. Don't type festive discounts into the item; you'll make the offer in Step 4, and your normal price comes back by itself when it ends.
- Description — one or two lines with the words a buyer would search for: colour, size, material, brand.
- When it runs out — tick Take orders even when out of stock for items you can restock quickly, and set Days you need to deliver it.
- Tell your customers — leave both off for now; you'll announce your sale in Step 5.
Press Publish item. SmartShop asks Do you want to publish another item? — press Yes, add another until your hero items are all in, then No, done.
Activity 2.2 — Turn items on for your storefront
Days 1–3 · 10 minutes Publish Item → Many at once / Share Items
Activity 2.2: turn items on for your storefront.
An item shows on your online store as soon as you publish it. To check or change many at once:
- Open Publish Item → Many at once. The page Publish multiple items lists your items in a grid.
- For each row, check the Display Name, Category, Display Price, Description and photo (Select files).
- Tick Online ordering? so shoppers can order the item, and Make item searchable? so it shows up when they search your store. Tick a column header to tick it for every row.
- Press Save changes once.
- Open Share Items. Your published items are there with a count of published, featured and hidden. Press the 👁 eye on an item to see it exactly as a shopper does.
Stock settings (in Store Settings → Setup → Stock) decide what shoppers see when you run out. They are off at first. Only turn on Stop customers buying more than I have or Show how many are in stock if your stock counts in SmartShop are correct — otherwise the store will tell shoppers the wrong thing.
Activity 2.3 — Connect Paystack or Flutterwave, and your WhatsApp number
Days 1–3 · 15 minutes (longer if you need a new Paystack/Flutterwave account) Store Settings → Setup
Activity 2.3: connect Paystack or Flutterwave, and your WhatsApp number.
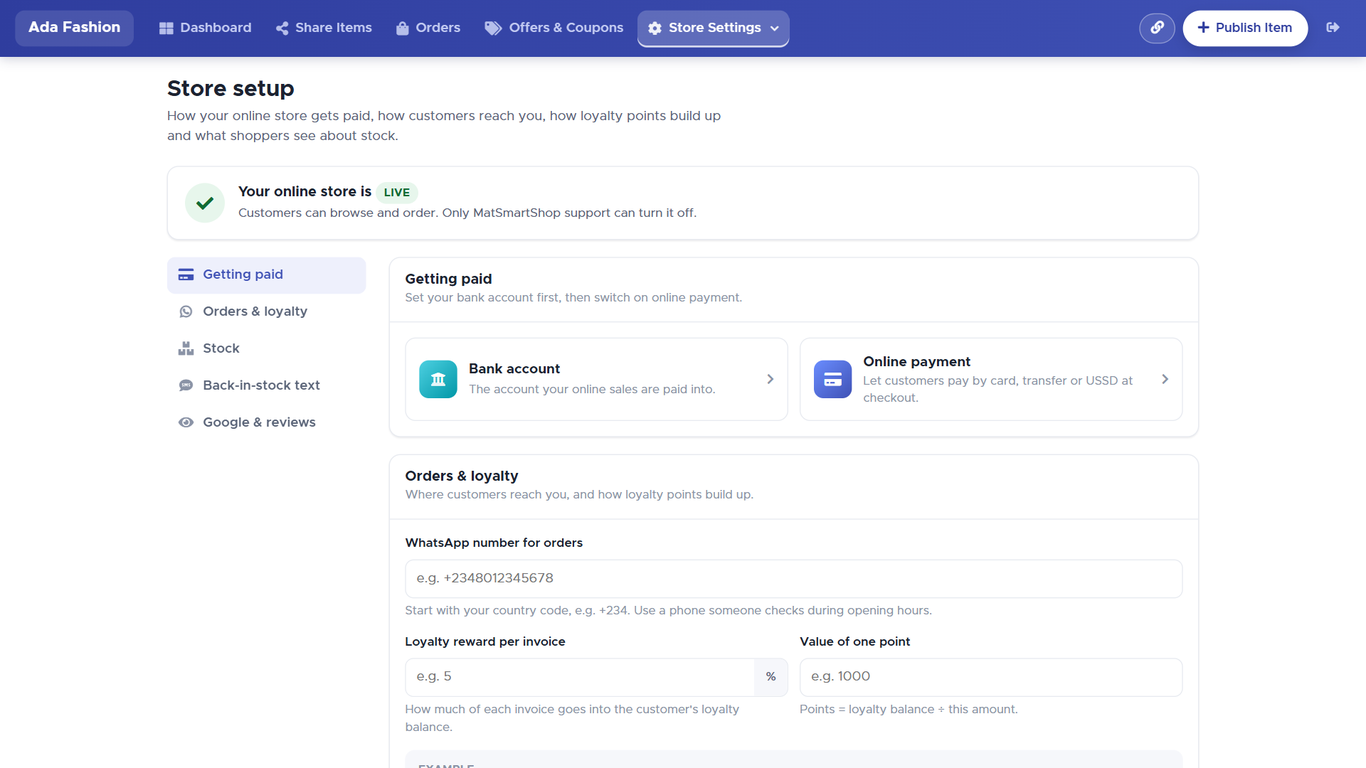
- In Wildfire, open Store Settings → Setup. The Store setup page has five parts: Getting paid, Orders & loyalty, Stock, Back-in-stock text and Google & reviews.
- Getting paid → Bank account — choose your Bank, type the Account Number and Account Name, and press Save. Do this before online payment. SmartShop emails you a link: click it to confirm the change.
- Getting paid → Online payment — choose the Payment Gateway (Pay Stack, or Rave for Flutterwave) and paste your Payment public key from your Paystack or Flutterwave dashboard. Press Save. SmartShop emails you a link to verify the key — it doesn't work until you click it. Then use Test Payment to try it.
- Orders & loyalty → WhatsApp number for orders — start with your country code, e.g. +2348031234567, and press Save. Use a phone someone checks during opening hours. WhatsApp is extra: every order is also saved in Wildfire → Orders.
- Open your store link (Activity 3.1) and place a small test order to see the checkout work. The order should appear in Wildfire → Orders, in the bell in your portal, in your email and on WhatsApp.
Step 3 — Get your customers ready
The aim of Step 3: when your offer starts, buyers are already waiting, your texts carry your shop's name, and your fans are ready to share.
Activity 3.1 — Share your store and ask shoppers to tap "Tell me when it's on sale"
Days 3–7, and keep going until launch Store Link · Share Items
Activity 3.1: share your store and collect sale alerts.
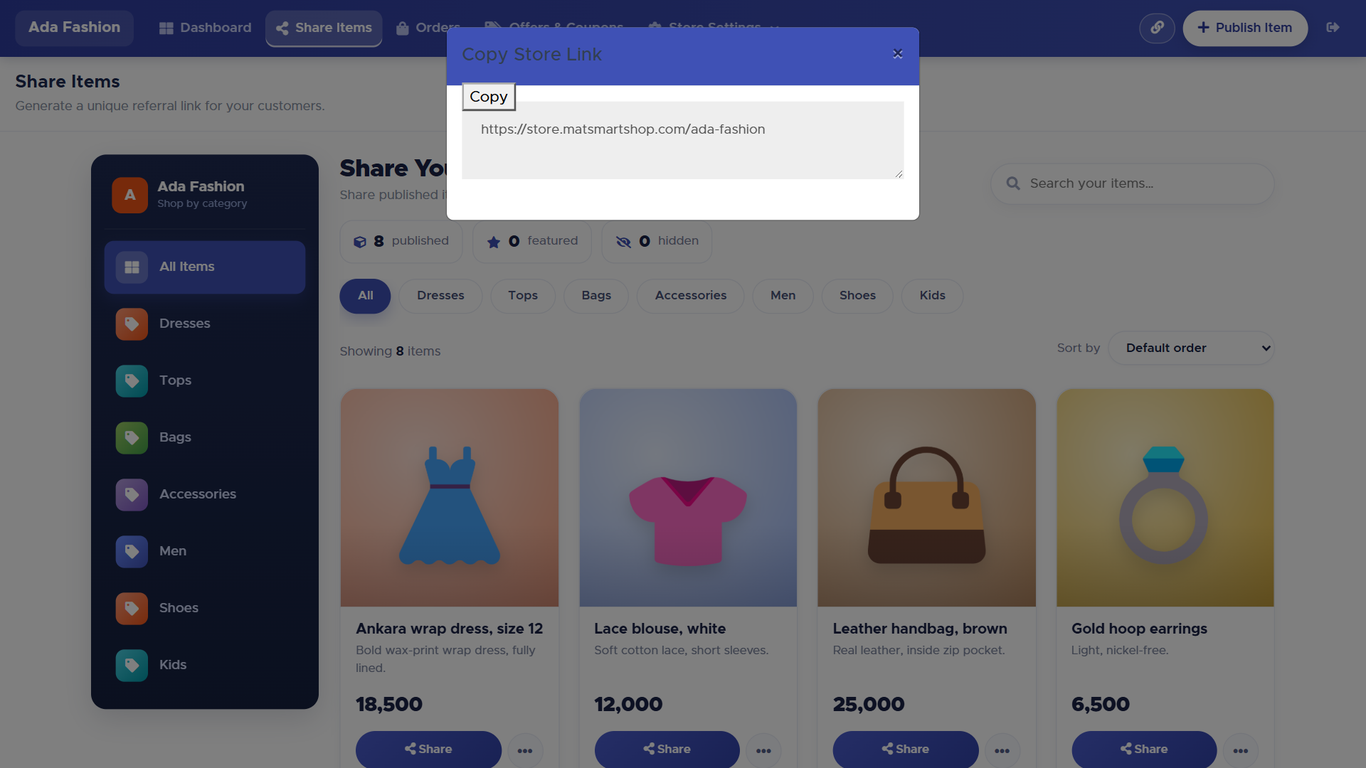
Share your whole store:
- Press Store Link in the top bar of Wildfire, then Copy.
- Paste it in your WhatsApp status, your WhatsApp groups, your Instagram/Facebook bio, flyers and receipts.
Share one item with one customer (e.g. the bag Adaora asked about):
- Open Share Items, find the item and press Share.
- In Select Customer, pick Adaora — or Anyone to post it to a group or your status.
- Press Share On WhatsApp. WhatsApp opens with the message and a short link ready to send.
Ask shoppers to sign up for your sale. On any item that is not on offer, shoppers see Tell me when it's on sale. They tap it and leave their phone number. When you start an offer on that item (Activity 4.2) with Text shoppers who asked to hear about a sale ticked, each of them gets one text.
Put it in your words when you share, for example:
"Black Friday deals are coming to our store! Open the link, find what you want and tap 'Tell me when it's on sale' — we'll text you the moment the price drops."
Activity 3.2 — Buy SMS units and ask for your sender name early
Days 3–7 · at least 3 working days before launch Store Settings → Buy SMS Unit (or Account → SMS Units)
Activity 3.2: buy SMS units and ask for your sender name early.
Every text you send — sale alerts, offer messages, restock texts, thank-yous, win-back messages — comes out of one SMS units balance. Your sender name is the name customers see at the top of your text instead of the shared SmartShop name.
Buy SMS units:
- In Wildfire, open Store Settings → Buy SMS Unit (under Messaging). The shop owner can also open Account → SMS Units in the main app. Staff accounts don't see this page.
- SMS units left shows your balance.
- Tap a pack, or use Or type how many. You pay shows the price.
- Press Continue to payment and pay on the secure page.
- When you come back you'll see Payment received and your new balance. If it says Your payment is still being confirmed, refresh after a few minutes.
A text uses one unit for each 153 letters, so a long message uses more. Plan for your whole customer list, plus the sale-alert sign-ups, at least twice over the season.
Ask for your sender name:
- On the same page, find the Sender name card.
- Type your Sender name: 3 to 11 letters or numbers, no spaces or symbols, at least one letter — e.g. AdaFashion.
- Fill What will you send? with a short example text, e.g. "Black Friday at Ada Fashion: 20% off all dresses till Sunday. Shop: [link]". The networks ask for this.
- Press Ask for approval. The card now says Waiting for approval.
- Press Check again after a day or two. You also get an email when the networks answer.
- A verified email address. If yours isn't verified, press Send me the verification email and click the link in it.
- At least ₦5,000 of SMS units bought in total. This is open to every plan, including Freemium.
Activity 3.3 — Turn on Affiliate Marketing so fans can share for a commission
Days 3–7 · 15 minutes Store Settings → Affiliate Marketing (under Catalogue)
Activity 3.3: turn on Affiliate Marketing.
An affiliate is someone who shares your store and earns a part of what they bring in — a loyal customer like Dozie, a friend with a big WhatsApp group, a trader who sends people your way. Each one gets their own link. You approve and pay every commission yourself.
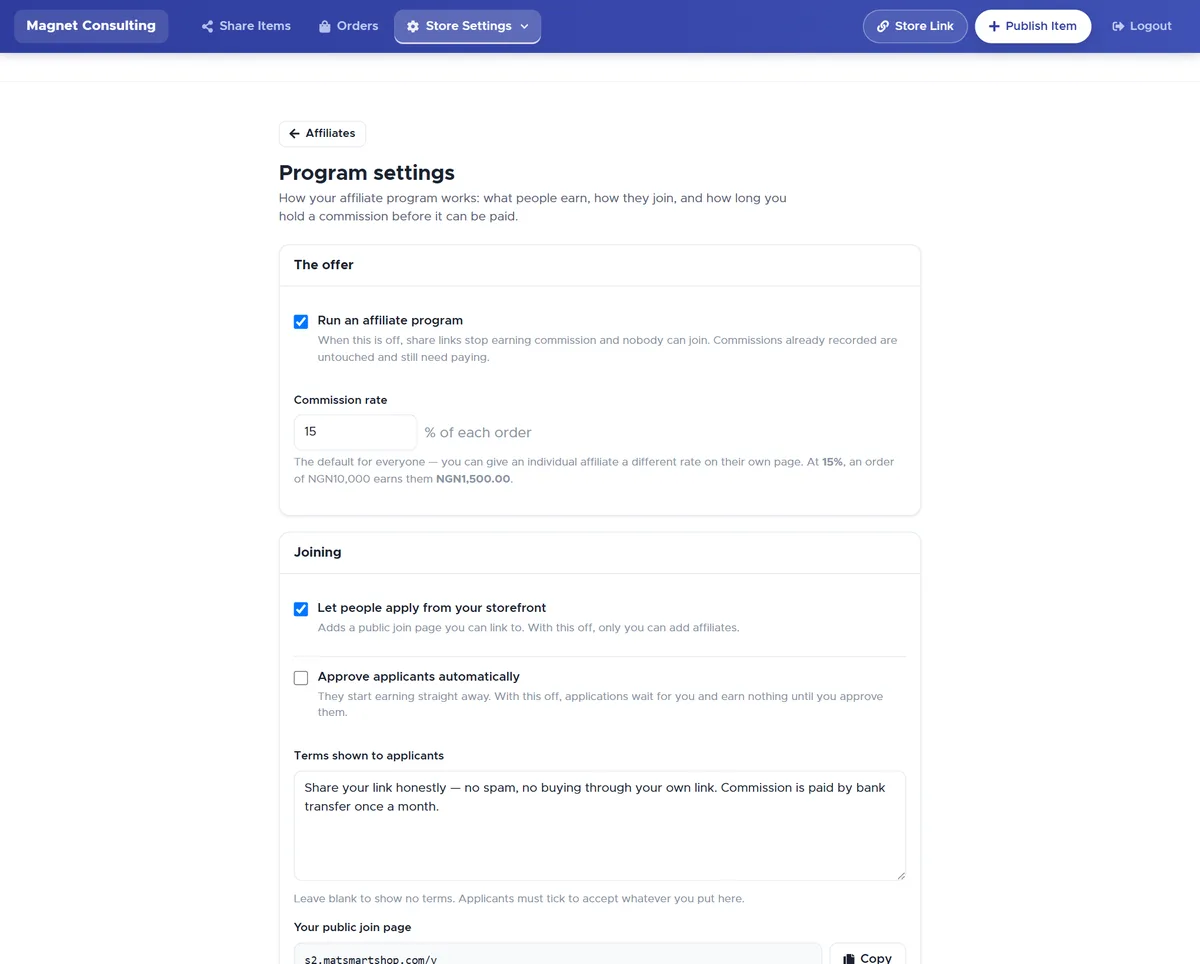
Switch the program on:
- Open Store Settings → Affiliate Marketing. A new store shows an orange warning: the program is off.
- Press Program settings.
- Turn on Run an affiliate program.
- Set the Commission rate — e.g. 10%. The example line underneath shows what one order earns them.
- Choose whether to Let people apply from your storefront, and whether to Approve applicants automatically. If you are not sure, leave automatic approval off so you see who joins first.
- Set Hold commissions for … days (e.g. 7) so you never pay out on an order that is returned. Set Remember a referral for … days (e.g. 30) so a buyer who comes back later still counts.
- Press Save settings.
Add your fans:
- Back on the main page, press Add affiliate.
- Use Start from an existing customer to pick Dozie — his name, email and phone fill in. (New shop with no customers yet? Skip that box and type the person's Name and their Email or Phone.) Leave the rate empty to use the program rate.
- Save. Then press Link on his row and Send on WhatsApp. He gets two links: his share link (public — he should post it everywhere) and his private dashboard (keep it secret; it shows his earnings).
Full details: Affiliate Marketing guide, sections 2–6.
Step 4 — Create offers and coupons
Open Offers & Coupons in the Wildfire top bar. Across the top you see Offers running now, Sold on offers, Discount given and Coupon uses. Below are two tabs, Offers and Coupons.
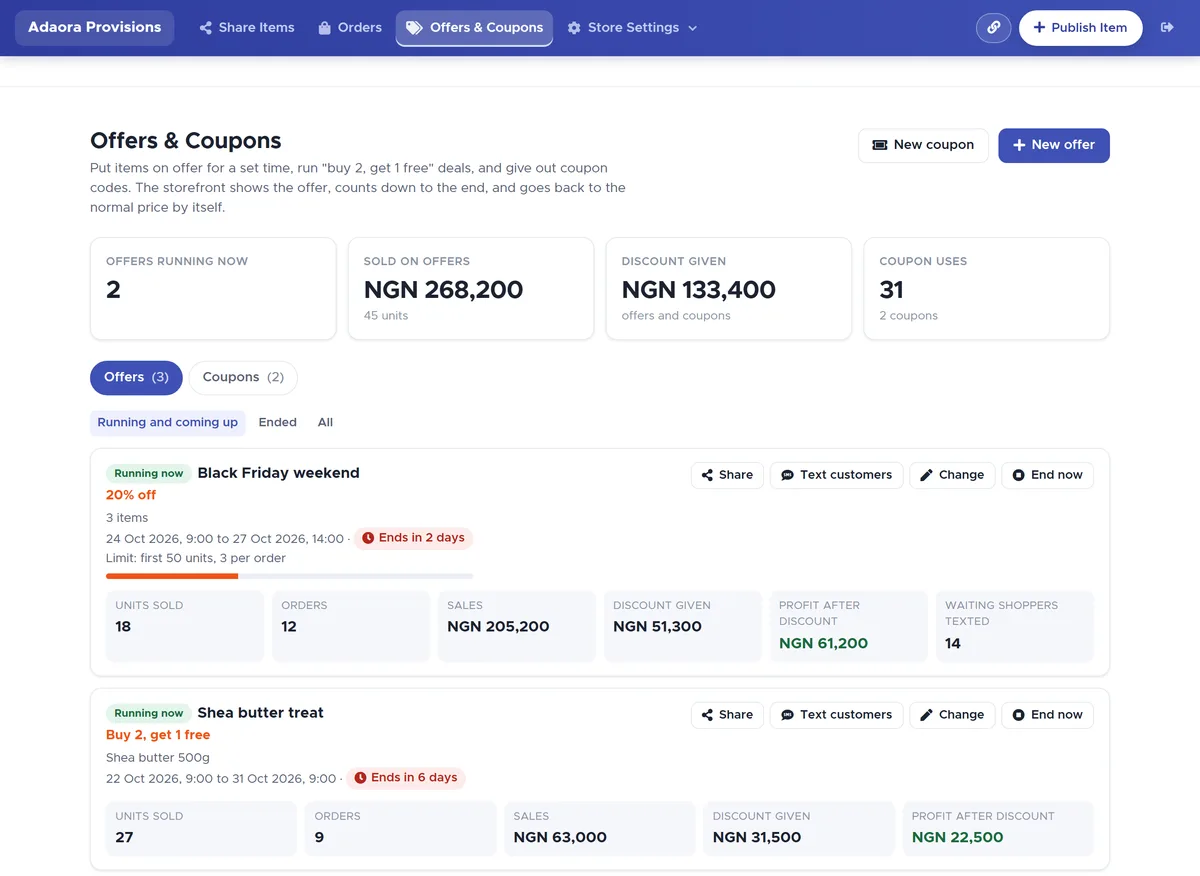
Activity 4.1 — Pick a deal
By 20 Nov · 5 minutes per offer Offers & Coupons → New offer
Activity 4.1: pick a deal.
- Press New offer.
- Name of the offer — shoppers see this, so make it clear: "Black Friday — 20% off all dresses".
- What kind of offer? — pick one and fill in its figures:
| Kind | Example | How it works / when to use it |
|---|---|---|
| % off | 20% off | Every unit is cheaper by this percentage. The simplest Black Friday deal. |
| Money off | ₦500 off each | This much comes off each unit. Good for items with very different prices. |
| New price | Sell at ₦1,500 | Each chosen item sells at this price. Items already cheaper are left out. Good for "everything ₦1,500". |
| Buy some, get some free | Buy 2, get 1 free | Counted per item: buy 2 of the same item, get 1 more free. Moves slow stock. |
| Bundle price | 3 for ₦5,000 | Counted per item. Extra units are at the normal price. Raises the size of each order. |
- Which items? — Items I choose, Whole categories (items you publish later in those categories join too) or Everything in my store.
- Optional limits: a total number of units ("first 50 only" — after that, the normal price), and units per order, which stops one buyer taking the whole offer.
- Look at What shoppers will pay — each item's offer price, and your profit after the discount where the item has a cost price. Make sure you are still making money.
Activity 4.2 — Set start and end dates and show the countdown
By 20 Nov Same New offer form
Activity 4.2: set the dates and the countdown.
- Set Starts and Ends, or tap a shortcut: Today only, This weekend, 7 days from now or 30 days from now. For Black Friday, e.g. start Friday 27 Nov at 00:00 and end Monday 30 Nov at 23:59.
- Tick Show a countdown to the end. Shoppers see "Ends in 2 days" on the item, so they hurry.
- Tick Text shoppers who asked to hear about a sale. Everyone who tapped Tell me when it's on sale on these items (Activity 3.1) gets one text when the offer starts, paid from your SMS units.
- Press Save offer.
You can make the offer now and let it start by itself on the date — that's the point of finishing by 20 November.
What shoppers see: a % OFF badge with the old price crossed out, a ribbon for "buy some, get some free" and bundle deals, Ends in … when you chose a countdown, and an Offers strip on your store listing what's on now.
Activity 4.3 — Make coupon codes, and give each affiliate their own
By 20 Nov · 2 minutes per code Offers & Coupons → Coupons → New coupon
Activity 4.3: make coupon codes, one for each affiliate.
- Press New coupon.
- Type the Code shoppers type, or press Make one. Letters and numbers only (a dash is fine), e.g. XMAS10.
- Discount — % off the items (with an optional Most it can take off) or Money off the order.
- Optional: Order must be at least (e.g. ₦10,000), Starts/Ends, How many times in total, and Times per shopper (checked by email and phone number).
- Leave Also take it off items already on offer unticked unless you really mean to give a double discount. Unticked, the code only works on items at their normal price — safer.
- For an affiliate: choose them in Give credit to an affiliate. Orders that use the code count as their sales, unless the shopper came through someone else's link. Use a code with their name in it, e.g. DOZIE10.
- Press Save coupon.
Shoppers type the code at checkout under Have a coupon code?. You can switch a coupon off at any time — the code stops working straight away.
Step 5 — Launch, handle orders, protect, follow up
Activity 5.1 — Send the offer link and codes with Share and Text customers
The morning the offer starts (27 Nov), and again before it ends Offers & Coupons → your offer → Share / Text customers
Activity 5.1: send the offer link and codes.
Share it yourself (free):
- On Offers & Coupons, find your offer and press Share.
- You get a ready message with the offer link. Copy it, or send it on WhatsApp — to your status, your groups and your best customers.
- Do the same on the Coupons tab to share a code. Send each affiliate their own code with their link.
Text your customers (uses SMS units):
- On the offer, press Text customers. The Text my customers window opens.
- Choose all your customers or people who ordered online. Customers on your do not text list are left out by themselves. Only customers saved in SmartShop with a phone number can be texted — in a brand-new shop this may be a short list, so lean on Share and your affiliates.
- Check the message and the cost shown before you send, then send.
During the season — handling orders on the platform
Every day the offer runs · a few minutes per order Wildfire → Orders
Handling orders on the platform.
WhatsApp is only one way an order reaches you. Every online order is also saved in SmartShop, and you can work it from start to finish on the platform — even if you never open WhatsApp. When a shopper orders:
- It appears in Wildfire → Orders straight away.
- The bell at the top of your SmartShop web portal shows it, with the customer's name, how many items and the amount. Click it to open your order list.
- You get an email for every order (check your spam folder the first time).
- If the shopper chose to send it, the order also arrives on your WhatsApp.
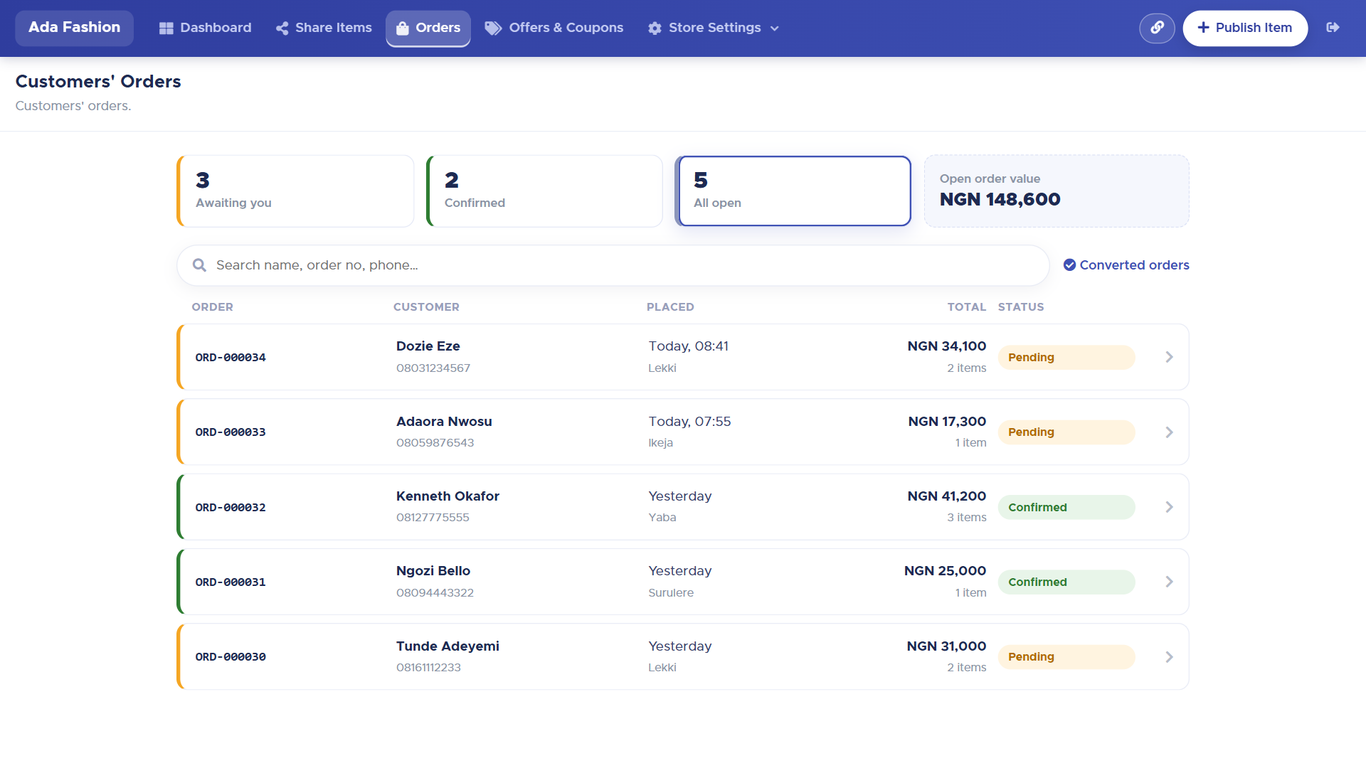
The Orders page:
- Awaiting you, Confirmed, All open and Open order value run across the top. Click one to show only those orders. Start each morning with Awaiting you.
- Search name, order no, phone… finds an order fast — e.g. when Kenneth calls about his.
- Every order has its own number, like ORD-000034. Quote it to the customer so you are both talking about the same order.
- Converted orders shows the orders you have already turned into invoices.
Working one order:
- Click the order to open Order Detail. You see the items, the delivery fee for the area the customer chose, and the total.
- Look at Payment. It tells you plainly whether money has arrived — e.g. No online payment recorded — and the transfer reference the customer was given. If they paid by transfer, check their receipt first (Activity 5.2).
- Use the Call, WhatsApp or Email buttons to reach the customer — about delivery time, a missing item or payment.
- Press Confirm order to accept it. Its status moves from Pending to Confirmed.
- When you are ready to deliver, press Convert to invoice. Say how it was paid and how much. The invoice is created in Sales & Customers with the offer and coupon prices the shopper actually paid.
- Press Print if you want a paper copy to pack with the goods.
Activity 5.2 — Check the transfer receipt before goods leave the shop
Every bank-transfer payment during the season Sales & Customers → Check a Transfer Receipt (cashiers) · Bank & Cash → Check a transfer receipt (owner)
Activity 5.2: check the transfer receipt before goods leave.
In the festive rush, fake transfer alerts are common: a customer shows a "receipt" for money that never arrived. Check it before you hand over the goods.
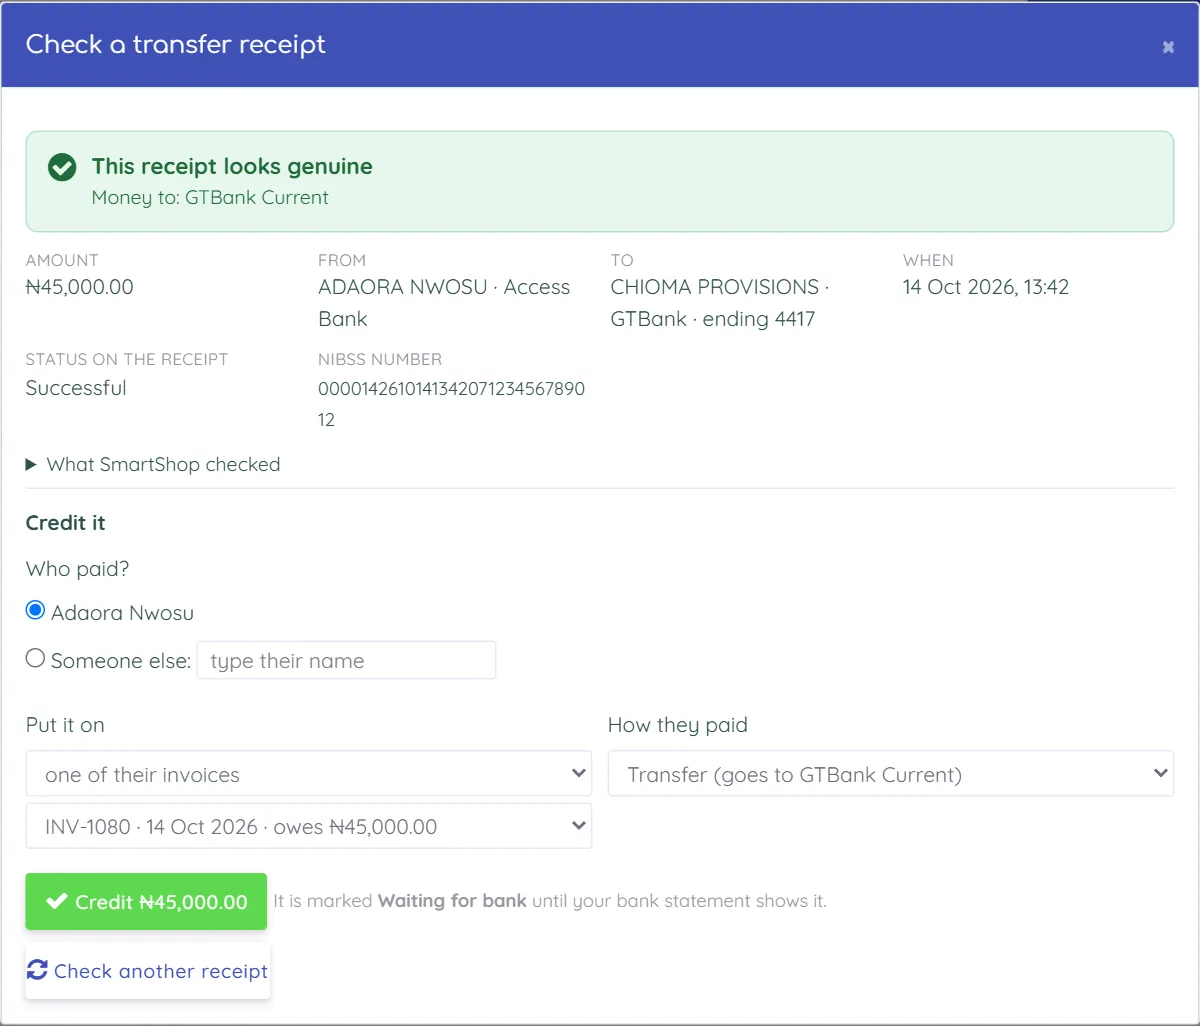
- Open Sales & Customers → Check a Transfer Receipt (the owner can also press Check a transfer receipt on the Bank & Cash home page).
- Upload the receipt — the PDF from the customer's bank app, or a picture of it (a screenshot, or what they sent on WhatsApp).
- If you like, type what the customer is paying.
- Read what SmartShop says and act on it:
| SmartShop says | What to do |
|---|---|
| Looks genuine (green) | Credit it: choose who paid (e.g. Kenneth), whether it goes on his balance or one of his invoices, and how he paid. Press Credit. |
| Check carefully (orange) | Open What SmartShop checked to see why. Look in your own bank app before you accept it. |
| Don't accept this (red) | Don't give the goods and don't mark it as paid. Only the owner, or a manager allowed to Accept Anyway, can still accept it, and must say why. |
- Let cashiers do it: the Cashier role already includes it. For other staff: User List → Edit → tick Transfer Receipts – Check and Credit.
- Checking a receipt uses usage units. If SmartShop can't read the receipt, it's free.
- Online orders paid through Paystack or Flutterwave don't need this — the payment is confirmed by the payment company.
Activity 5.3 — Let win-back messages bring buyers back, then Run this offer again
Set up before 27 Nov; runs by itself through January Sales & Customers → Automatic Messages · Customer Follow Up · Offers & Coupons
Activity 5.3: bring buyers back, then run the offer again.
Every festive buyer should become next season's buyer. Three tools do this for you.
A. Thank every buyer automatically
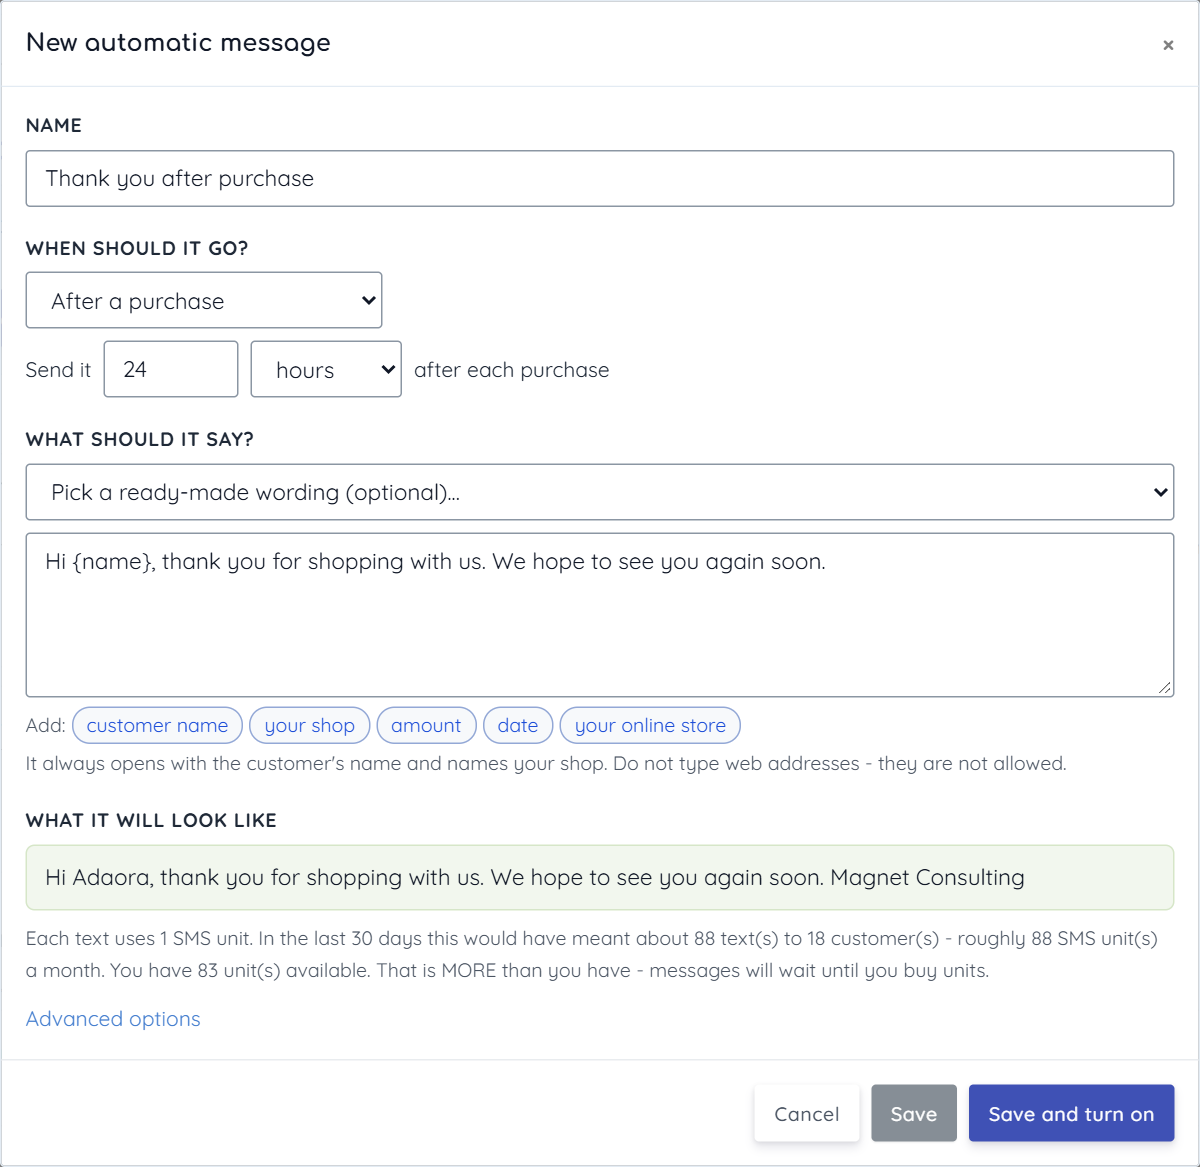
- Open Sales & Customers → Automatic Messages.
- Press the thank-you starter (or Add a message). Give it a Name — customers never see it.
- When should it go? — After a purchase, e.g. 24 hours after.
- What should it say? — pick a ready-made thank-you, or write your own. Use the buttons to add the customer's name or your online store address. The greeting and your shop's name are added by themselves.
- Read What it will look like and the cost line, then press Save and turn on and confirm.
Under Advanced options, set Never more than N texts a day as a ceiling — on a busy festive day a thank-you to every buyer can use a lot of SMS units.
B. Win back customers who have gone quiet (January)
- Open Customer Follow Up → Gone Quiet.
- Set Quiet for at least (e.g. 30 days) and tick Repeat buyers only.
- Check the message — e.g. "Hi Dozie, it has been 35 days since your last visit to Ada Fashion. New stock is in — come and see us." Add your store link if you like.
- Send now, or use Automate to send on a schedule. Use the Bought Once tab the same way for festive first-time buyers.
C. Run the offer again for the next season
- On Offers & Coupons, set the filter to Ended.
- Look at Sold on offers and Discount given for each offer. Keep the ones that worked.
- Press Run again on a good one. The form opens as Run this offer again, filled in with the old offer. Change the name and the dates (e.g. "New Year Sale", 1–7 Jan) and press Save offer.
After the season — reuse it
You only set up once. The same store, affiliates, sender name and automatic messages carry on. For each new season, just repeat Step 4 and Step 5:
| Season | Typical offer | Start preparing |
|---|---|---|
| New Year | Clearance — "New price" or "Buy 2, get 1 free" on leftover festive stock | Late December |
| Valentine's | Bundle price on gift items | Late January |
| Ramadan & Sallah | % off food and clothing; coupons for loyal customers | Two weeks before |
| Easter | Money off; Text my customers to everyone | Two weeks before |
| Back-to-school | Bundle price on school items; affiliate codes for parents' groups | Early August |
In each case: Offers & Coupons → Ended → Run again, change the dates, ask shoppers to tap Tell me when it's on sale, and top up your SMS units.
Ready-to-launch checklist
Tick these off before your first offer goes live.
- Free profile created and email confirmed (1.1, 1.2)
- Seller terms accepted; Wildfire open (2.1)
- Hero items published with photos and clear names (2.1, 2.2)
- Categories and delivery fees set (2.1)
- Bank account saved and confirmed by email; Paystack or Flutterwave key saved and verified; test order placed (2.3)
- WhatsApp number linked (2.3)
- Test order seen in Wildfire → Orders, confirmed and turned into an invoice
- Store link shared; shoppers asked to tap "Tell me when it's on sale" (3.1)
- SMS units bought; sender name requested at least 3 working days ago (3.2)
- Affiliate Marketing switched on; fans added and sent their links (3.3)
- Offer created with start and end dates, countdown and sale-alert texts ticked (4.1, 4.2)
- Coupon codes ready, one for each affiliate (4.3)
- Cashiers know how to check a transfer receipt (5.2)
- Thank-you message switched on, with a daily limit (5.3)
If something isn't working
| What you see | What to do |
|---|---|
| No verification email arrived | Check spam and promotions folders. In Wildfire's first-time screen you can also verify by phone with a 6-digit code instead. |
| Wildfire keeps showing "Before you open your online store" | Both steps are needed: accept the seller terms and verify your email or phone. |
| An item doesn't show on my store | Check it is published and isn't hidden (Share Items → ⋯), and — if Hide items that are sold out is on — that it has stock or takes orders when out of stock. |
| Customers can't pay online | Check Store Settings → Setup → Getting paid → Online payment: the public key from Paystack or Flutterwave is saved, and you clicked the link in the verification email. |
| I can't ask for a sender name | The card says why: verify your email, or buy SMS units until your total reaches ₦5,000. |
| Texts arrive from the shared SmartShop name | Your sender name is still waiting for the networks. Press Check again on the Sender name card. |
| Sale-alert or offer texts didn't go out | Check your SMS units balance. Texts wait until you top up. Check you ticked Text shoppers who asked to hear about a sale on the offer. |
| An item's offer price isn't showing | Check the offer's start and end, and whether its unit limit is used up. A "New price" offer leaves out items already cheaper. |
| A shopper says the coupon doesn't work | Check it is on and in date, the order reaches the minimum, the shopper hasn't used up their times, and the items aren't already on offer (unless you ticked Also take it off items already on offer). |
| An affiliate's sale didn't earn commission | Check the program is on and the affiliate is Active, not Awaiting. Self-referrals never earn. |
| I missed an order on WhatsApp | Nothing is lost. Every order is saved in Wildfire → Orders — check Awaiting you. New orders also show in the bell in your portal and in your email. |
| A transfer receipt was credited but the money never came | In Bank & Cash → More → Transfer receipts checked, press Take back. The customer owes it again. |
Quick reference
| # | I want to… | Go to |
|---|---|---|
| 1.1 | Sign up | matsmartshop.com → Get started free |
| 1.3 | See my usage units | Account → My Usage |
| 2.1 | Open my online store's back office | Left menu → Tools → Wildfire |
| 2.1 | Put an item online | Wildfire → Publish Item |
| 2.2 | Publish many items at once | Publish Item → Many at once |
| 2.3 | Connect card/transfer/USSD payments and WhatsApp | Store Settings → Setup |
| 3.1 | Copy my store link | Store Link → Copy |
| Step 5 | See and work my online orders | Wildfire → Orders (or the bell in the portal) |
| 3.1 | Send one item to one customer | Share Items → Share → Share On WhatsApp |
| 3.2 | Buy SMS units / ask for my sender name | Store Settings → Buy SMS Unit (or Account → SMS Units) |
| 3.3 | Turn on affiliates | Store Settings → Affiliate Marketing → Program settings |
| 4.1–4.2 | Make an offer with a countdown | Offers & Coupons → New offer |
| 4.3 | Make a coupon for an affiliate | Offers & Coupons → New coupon → Give credit to an affiliate |
| 5.1 | Send the offer to customers | Your offer → Share / Text customers |
| 5.2 | Check a transfer receipt | Sales & Customers → Check a Transfer Receipt |
| 5.3 | Thank buyers automatically | Sales & Customers → Automatic Messages |
| 5.3 | Win back quiet customers | Customer Follow Up → Gone Quiet |
| 5.3 | Reuse an offer next season | Offers & Coupons → Ended → Run again |